
Want to convert your audio tape cassettes into digital audio? Maybe you have a couple of old recordings that you’d like to store in digital format.
Sure, cassettes make great collectibles. When initially launched, they were praised for their convenience and portability. Today, in a digital world – listening to tapes gives you that retro, nostalgic and unique sound. Some audio enthusiasts also claim that it’s more enjoyable to listen to music on a cassette.
However, compared to their physical counterparts like vinyl, cassettes suffer a few quirks. Here are some of them:
That’s why, in this guide, you’ll learn how to convert analog audio (cassettes) into digital audio – to get higher audio quality, editability and portability.
We’ll also go through some audio restoration and cleaning processes that will be useful, especially if you’re restoring degraded audio.
First, it’s worth understanding the difference between analog and digital audio.
For a start, most of the music you listen to today would be in digital audio. Think – iPods, playing music from your smartphone, computer, TV, and digital CDs.
Analog audio came about during the early days of sound recording technologies. Air pressure (sound waves) is captured using a microphone, which is then turned into electrical analog signals. These analog signals are then imprinted onto tape cassettes through magnetization or as grooves on vinyl records.
Digital audio on the other hand is recorded by turning analog audio signals into a series of numbers (data) that music players and audio software (on your computer & smartphone) can read and reproduce as sound.
Since digital audio is actually just data, it’s easily copied into CDs, flash drives, or uploaded online for widespread playback.
The beauty of digital audio is that they do not degrade over time and can be copied, edited, and mixed perfectly without introducing additional noise.
If you’re converting from analog to digital audio, its quality first depends on the source of audio. But once in a digital format, there are only two factors that determine its quality.
As sound waves get converted into data, sample rates are the number of samples (snapshot measurement) captured per second to represent a waveform.
Sample rates are measured in hertz (Hz). You may find options for 44.1kHz, 48 kHz, 96kHz – on your audio editing software. Higher sample rates allow higher audio frequencies to be represented.
However, the sample rate must be more than double the highest audio frequency in an audio recording. Frequencies that are more than half the sample rate (a limit known as Nyquist frequency), cannot be converted properly by an audio-to-digital (ADC) and ends up as audio artifacts in their audio, known as aliasing.
So since we humans can hear frequencies between 20 Hz and 20,000 Hz, the standard sample rate for consumer audio is 44.1kHZ, where, technically – it allows audio frequencies up to 22.05kHz to be converted.
Generally, choosing to work in higher audio sample rates like 48 kHz, 96 kHz, and even 192 kHz, means you get the benefit of a higher-resolution audio recreation, as there are more samples per second.
Sample bit depth generally means the number of computer bits, used to represent each sample. The more bits used, the more precise the representation of each sample. Increasing the bit depth also increases the maximum dynamic range of an audio recording.
The dynamic range refers to the difference in volume between the softest and loudest possible sounds in an audio recording. Since our human ears can generally perceive sounds with a dynamic range of 90 dB, 16-bit depth is chosen as a standard – because it has a dynamic range of 96 dB.
When working on a project, it’s a good idea to work with a higher audio bit depth before bouncing it back to 16-bit, so that you have more headroom before any audio distortion happens.
Note: Increasing audio sample rates & bit depth may seem like a solution to restoring bad analog audio, but note that you cannot recreate sound bits that were not present in an audiotape in the first place.
Phew, that was a long, but necessary introduction.
Now that you understand the difference between analog and digital audio, let’s go into converting our cassettes into digital audio.
Converting cassettes (analog audio) into digital audio on your computer is quite simple.
First, we’ll need a tape player to play the cassettes. We’ll then record the line outputs into an audio workstation (DAW) on our computer via line-outs on the tape player. Then when we have the audio in digital format, do some audio restoration and cleaning work.
Here’s what you’ll need:
Let me explain these items in more detail.
There are two types of players you can use to convert cassettes into digital audio; either using a USB cassette converter or a tape deck.

A USB cassette converter (Reshow)
A USB cassette converter is made to convert tape cassettes into digital audio. Simply connect the converter to your computer via USB and using a supplied software, convert your cassettes into digital audio.
The downside to using USB converters is that the sound quality depends on the quality of the converter you buy. And most USB converters convert analog audio into a compressed digital format, like .MP3, whereas it is better to convert it directly to an uncompressed audio format like .WAV
Here are some top USB cassette picks:

I’d recommend using a tape deck to convert analog audio to digital, mainly to get a better sound quality. The way this method work is to play the tape on the player and record from the headphone or RCA outputs.
Technically you can use any old tape players – boomboxes or even the portable Walkmans that you have at home. Keep in mind though, you’ll get better sound quality with high-end tape players.
If you plan on using a USB cassette converter, you don’t need an audio interface.
However, with the tape deck method, you’ll need an audio interface that can accept the analog line-outs of your tape player. Audio interfaces come with USB, Thunderbolt, or FireWire connections, so get one that fits your computer ports.
Also, get a 2-input audio interface, as we’ll be recording a stereo output.
Here are some budget audio interfaces choices:
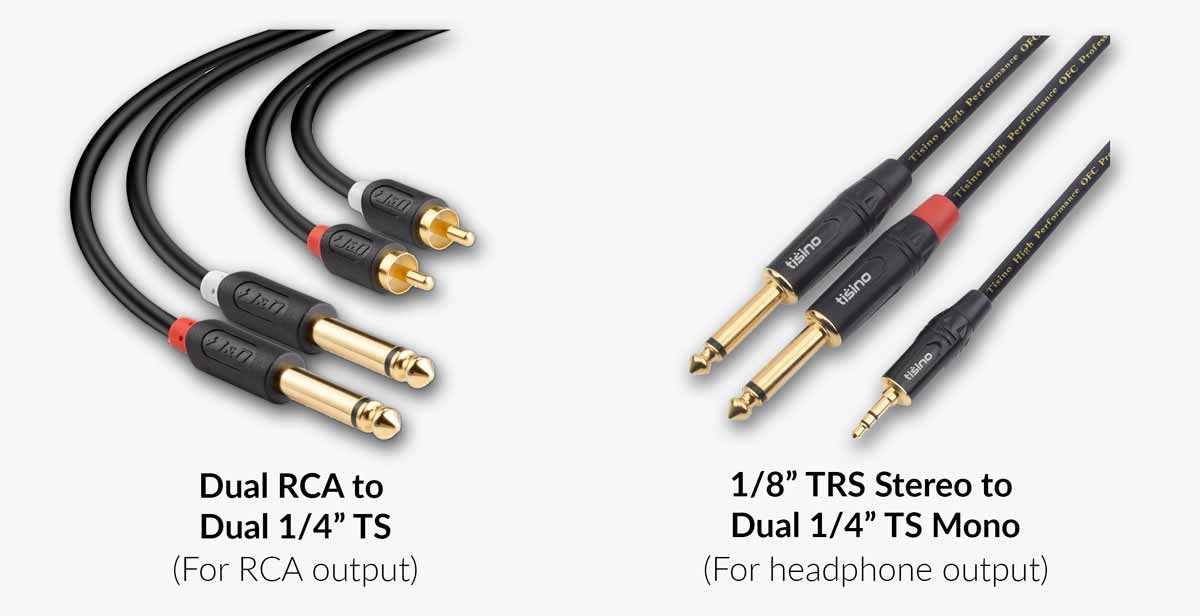
Most tape players have RCA and headphone outputs. Depending on the outputs available on the tape player you’re using, here are the audio cables you’ll need.
Generally, any capable DAWs that can detect your audio interface and record audio would work.
If you don’t have a preferred DAW to use, I recommend simply using Audacity, which you can download for free.
Tip: Alternatively, you could record from the tape player into a portable audio recorder, like the Zoom H1n.
Set up your tape player, choosing to line out either via the headphone or RCA outs into the inputs of your audio interface. We’re recording a stereo mix, so make sure to use two channels (left and right).
On your computer, launch Audacity and add a stereo track. Choose to record from both the input channels of your audio interface.
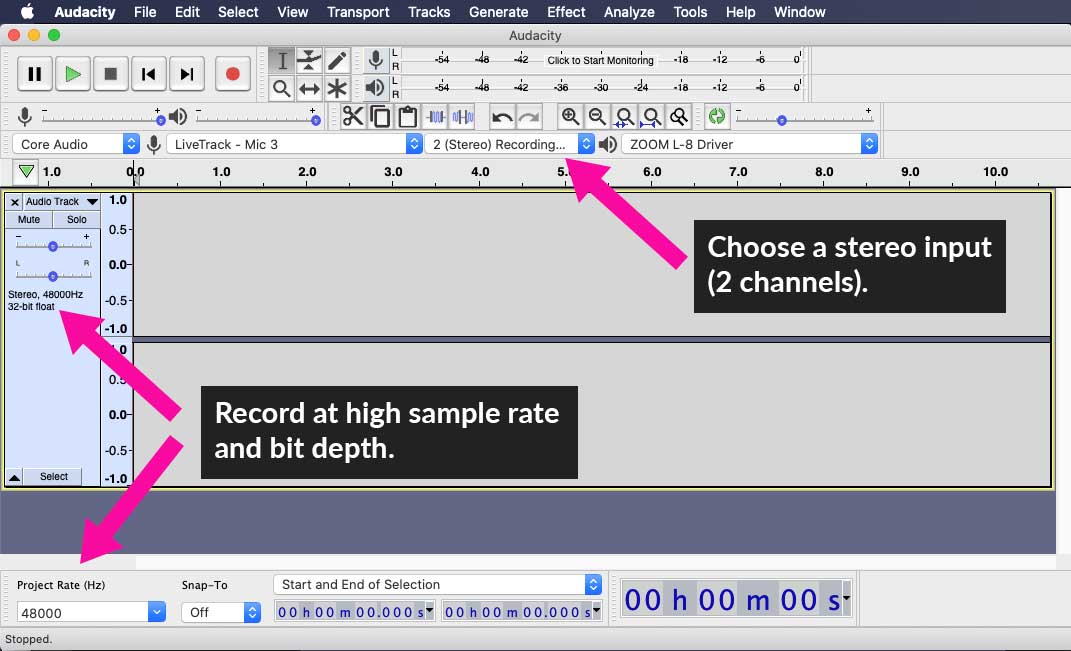 We want the best sound quality possible, so set your project and track to 48 kHz, 32-bit.
You’ll have to set the output volume on the tape player, as well as the input gains on your audio interface. The trick to getting an optimum audio level that isn’t too soft or clipping – is to set moderate levels on the tape player and gains on the audio interface.
Start by setting a moderate volume level on the tape player, then turn up the gains on the audio interface. Ideally, you want to make sure your audio recording doesn’t peak over -3dB.
Adjust the gain while playing through an entire song, making sure that no loud parts of the song cause your audio to clip.
Once you’ve set the audio levels, rewind the tape to the part you want to record from and make sure to arm the stereo track in your DAW. Then, hit record on your DAW and play the tape player.
Allow the cassette to play the entire song that you want to record fully. It’s alright to record slightly earlier and end a little later, as we’ll be editing the recorded track.
During this time, don’t unnecessarily change the input gains. This is so that you’ll get a consistent audio level throughout the song.
Now that we have our song converted into digital format on your DAW, it’s time to edit and clean it up.
In my example (using Audacity) below, you can see that the song I’m working with had some white noise, which is normal since the audio is converted from an analog cassette.
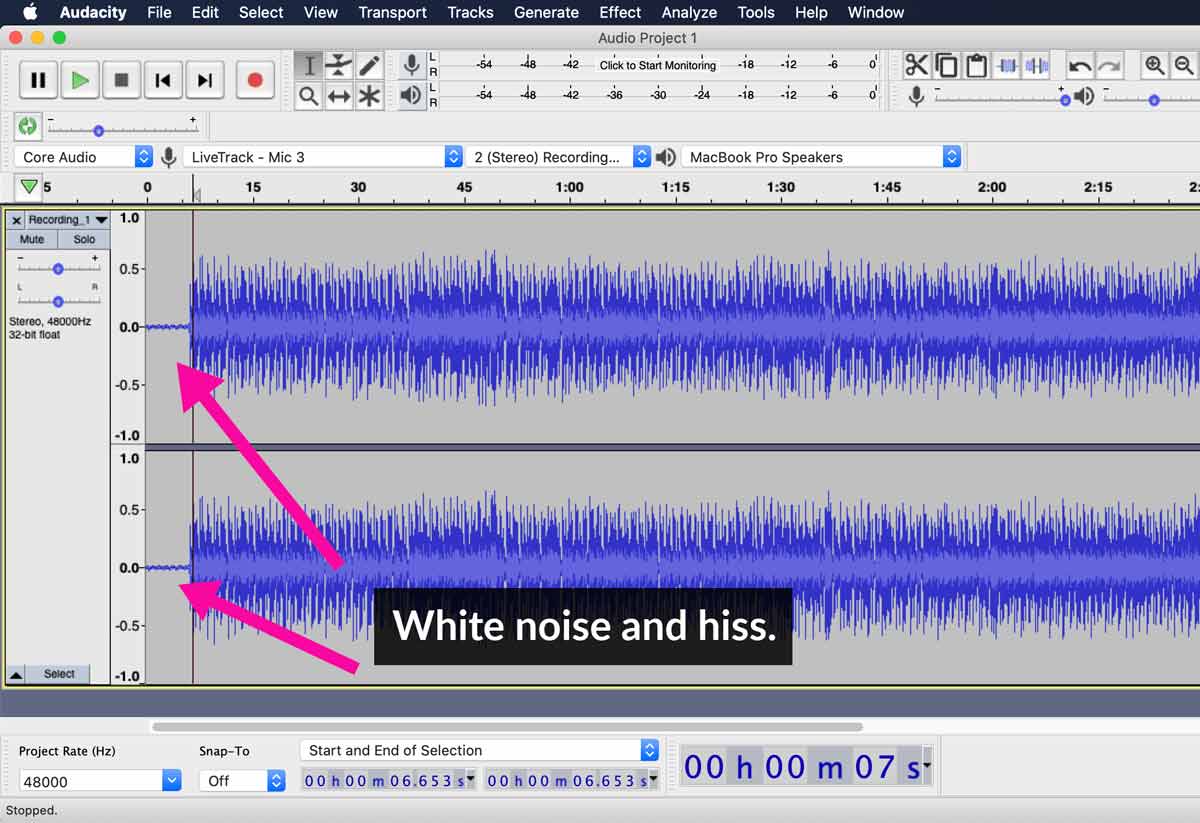
Luckily, it’s quite simple to remove the noise using a noise reduction effect. The way the noise reduction effect work is by first ‘learning’ the noise before filtering out the noise from the entire song.
First, highlight the part of the song that contains only the noise. Then under ‘Effects’, choose “Noise Reduction”. In the effect window, click on ‘Get Noise Profile’, so that the effect knows what to filter out.

Then effect window will close. Now, highlight the entire song and launch the noise reduction effect again.
You’ll find three settings that will enable you to choose how much of the noise you’d like to remove. Let me briefly explain them.
In my case, I chose a high noise reduction of 11dB, a sensitivity of 4.50, and a fairly high frequency smoothing of 8 bands.
This is not a definite setting and there’s no right or wrong setting. Rather, do a few previews as you adjust the settings before committing the process.
Watch the video below to see how I applied noise reduction on the song to get a cleaner song:
Once you’ve cleaned the song, trim the start and end to eliminate any unwanted silence.
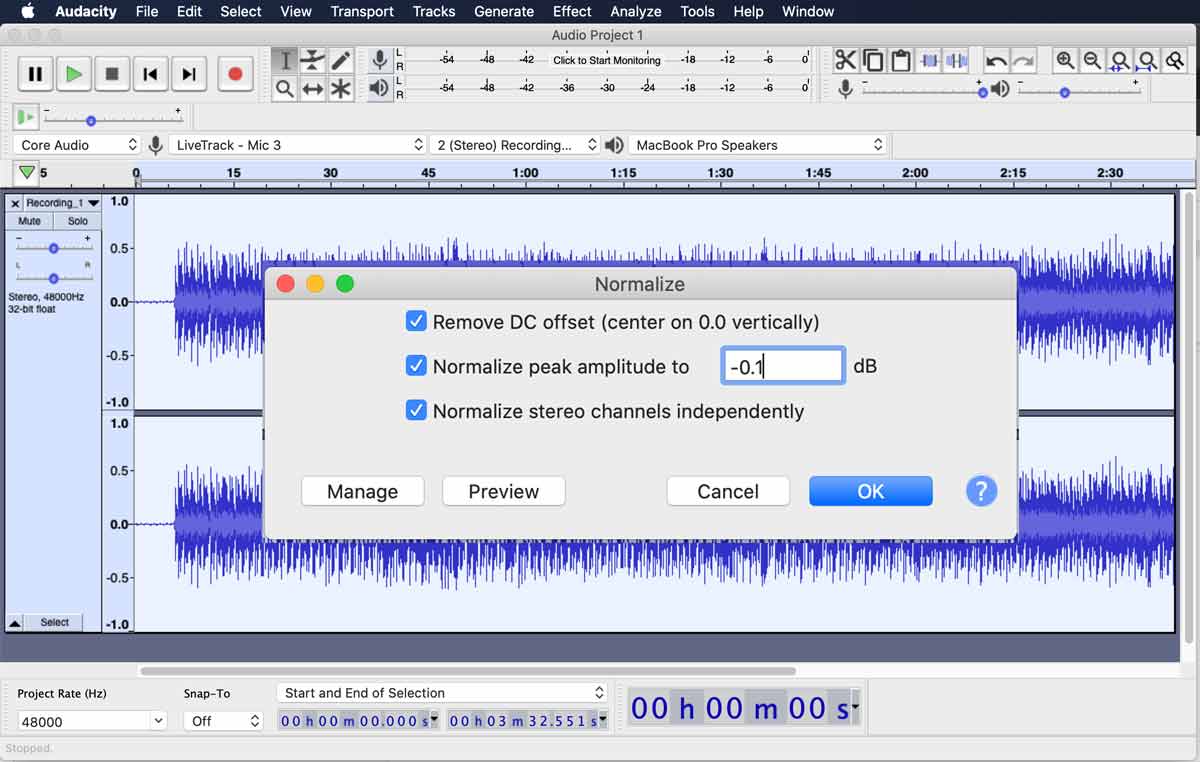
Because we recorded the song slightly softer with its audio level peaking at -3dB, we have to normalize the song, so that it is audibly loud enough when it’s played back on other systems.
Highlight the entire song and choose ‘Normalize’ under the Effects drop-bar.
Choose to check ‘Remove DC offset’, so that if your audio waveforms will be fixed if it’s not centered. I usually avoid normalizing to the maximum of 0dB and choose -0.1dB, to give the song a tiny headroom, to avoid any possible audio clipping.
Since we recorded the song via two separate inputs, I chose to normalize each of the stereo channels independently, to ensure both left and right audio channels are normalized to an optimum audio level.
It’ll take just a few seconds for the effect to normalize your song after you hit ‘OK.
And that’s it. Choose to export your song in your preferred audio format, as a .WAV or .MP3, and you’re done!
In some cases, because of the limitation of recording technology during the cassette era, the song you converted will probably have some distortion on the vocals or other instrumental elements in the song.
Maybe the song wasn’t mixed well, and you are hoping to do some re-mixing. Well, thanks to PhonicMind, our AI stems maker, this is now possible.
Upon converting the song from analog to digital audio, upload the song into PhonicMind, and process it with our AI-stems maker. The stems maker will break down the song into four separate audio stems that you can use for remixes.
Let’s break down how this would work.
Once you have converted the song into a digital format, export it as an uncompressed, high-resolution .WAV file.
Head on to PhonicMind, click on ‘Convert’ and upload your song into our AI stems maker. The stems maker works with high-resolution CD-quality audio in mind, that’s why it’s recommended that you use a high-resolution audio file for the best results.
It’ll take just a few minutes for our AI stems maker to break down your song into four audio stems – vocals, bass, drums, and others.

Then download the audio stems as high-resolution audio files, by choosing the .flac format option. Some DAWs do not work with .flac files, so you may have to convert the audio stems into .WAV format.
You can choose to do some audio clean-up and noise reduction, as you convert the audio stems into .WAV.
Once done, import the audio stems into your favorite DAW to begin mixing. From here, the sky is the limit to what you can do. Choose to do some re-mixing by changing the volume of the stems and adding effects, or turn the stems into audio samples for creative remixes.
It’s all really up to you.
In my case, I wanted to improve the mix so I did a little bit of mixing by adjusting the volume of the vocal stem, adding compressor effects on the bass & drum, including adding some minor EQ adjustments.
Take a quick listen to my simple mix:
With the song broken down into separate audio stems, feel free to get creative with the remixing possibilities you can do. We’ll leave some remixing tips for another post in the future!
By now you should know how to transfer and convert tape cassettes into digital audio. And even more, improve its quality and do remixes.
Remember, the key to getting good audio quality is to start from the source, where ideally, you want to use a high-end tape deck and audio interface. Then only comes the audio restoration and mixing in your DAW to further enhance your song.
Hopefully, this guide has been helpful to help you convert your audio cassettes.

Audio Mentor
-----
"Music producer and marketer. I create positive change!"