
In the previous tutorial post, we learned how to create a karaoke video – first removing vocals from a song, then creating a video.
Missed those tutorials? You can find them here:
With PhonicMind, our AI stems-maker, removing vocals from a song is easy. Just upload a high-quality music file and it’ll take no more than just a few minutes for our stems-maker to output a karaoke version of the song.
However, what if you have a song with lead and background vocals in it? Maybe you want to remove the lead vocals, but at the same time, retain the background vocals?
In this tutorial, I’ll show you how to do just that – using the help of our AI stems-maker, together with some effect processing and editing using a Digital Audio Workstation (DAW).
Let’s get started!
I’ll be using Logic Pro and its stock effects for this tutorial. It’s alright if you prefer using a different DAW. Fundamentally, the way we process a song to remove the lead vocals is the same.
So follow through with the tutorials even if you’re using a different DAW, as you’ll learn a few new tricks from this tutorial.
Most modern DAWs come included with EQ & compression plugins that support Mid/Side processing. If yours does not, here are two free 3rd-party AU/VST plugins you can use:
Before we jump into our DAW – first you need to understand what Mid-Side (M/S) processing is and what it does, as it’ll be quite an important process to remove only the lead vocals.
M/S short for Mid-Side is a process that allows us to selectively process either the lead and background vocals in a song.
How does it do it?
An M/S equalizer or compressor first encodes audio signals into separate mono (mid) and stereo (side) channels. Once it encodes the song into mid and side channels, we can then process the mids and sides independently.
With most music, elements like lead vocals and bass are usually mixed to the middle of the song, while elements like background vocals are normally panned to the left and right, to create a pleasant-sounding stereo soundstage.
So technically, with an M/S compressor and equalizer, we will be able to target the compressor to attenuate (reduce) the mids (lead vocals) and in the same way, target the equalizer to cut out some frequencies of the lead vocals.
Now that you understand how M/S processing works, let’s get started with removing lead vocals from a song.
The first method I’ll explain is a slightly outdated way of removing lead vocals from a song. However, it’s worth understanding how it works as you’ll learn some helpful tricks along the way.
For this tutorial, I chose a song, titled Walk Through Life by Pink Zebra.
Listen to a snippet taken from the song’s chorus below. You’ll hear that there’s a lead vocal going on, together with some adlib background vocals riffs.
Notice that the background vocals are somewhat panned to the sides and the lead vocals sit mainly in the middle.
First, we want to break down the song into separate audio stems. To do this, head on to PhonicMind, click on ‘Convert’, and upload your song into the stems maker.
Remember to use a high-quality file to get better-sounding audio stems.
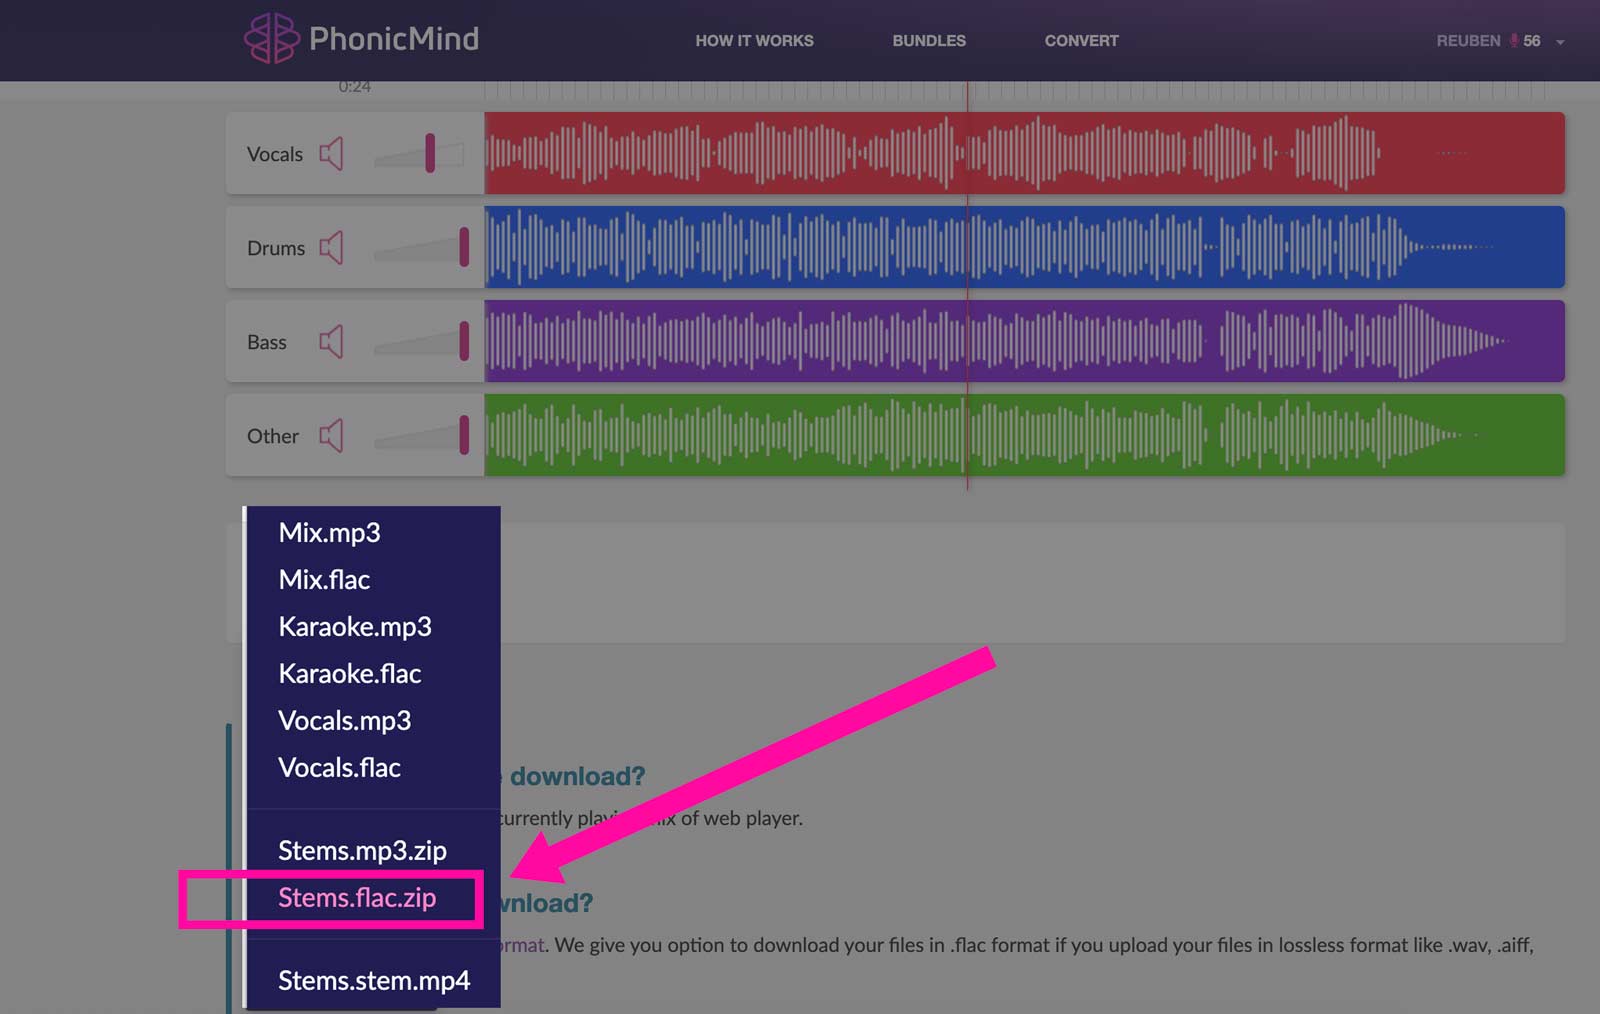
Once PhonicMind finishes processing your song, download all the audio stems, by choosing Stems.flac.zip. Choosing the .flac format option gives us a high-quality version of the audio stems.
You will get 4 audio stems – Vocals, Drums, Bass & Other. Notice that the vocal audio stem will contain both lead and background vocals, mixed together.
Watch the video below to hear the result so far from PhonicMind:
At this point, we could in fact dial the volume of the vocal track down, download the mix and call it a day!
But our goal is to remove only the lead vocals and retain background vocals, so let’s continue with some additional processing on our DAW.
Unzip the file that you’ve downloaded from PhonicMind. You’ll find four audio stems that you want to upload into your DAW as separate tracks.
In my case, Logic Pro did not accept .flac files. So I had to use Audacity to first convert the .flac files into .WAV files.
To convert .flac to .WAV files, first import your audio files into Audacity.
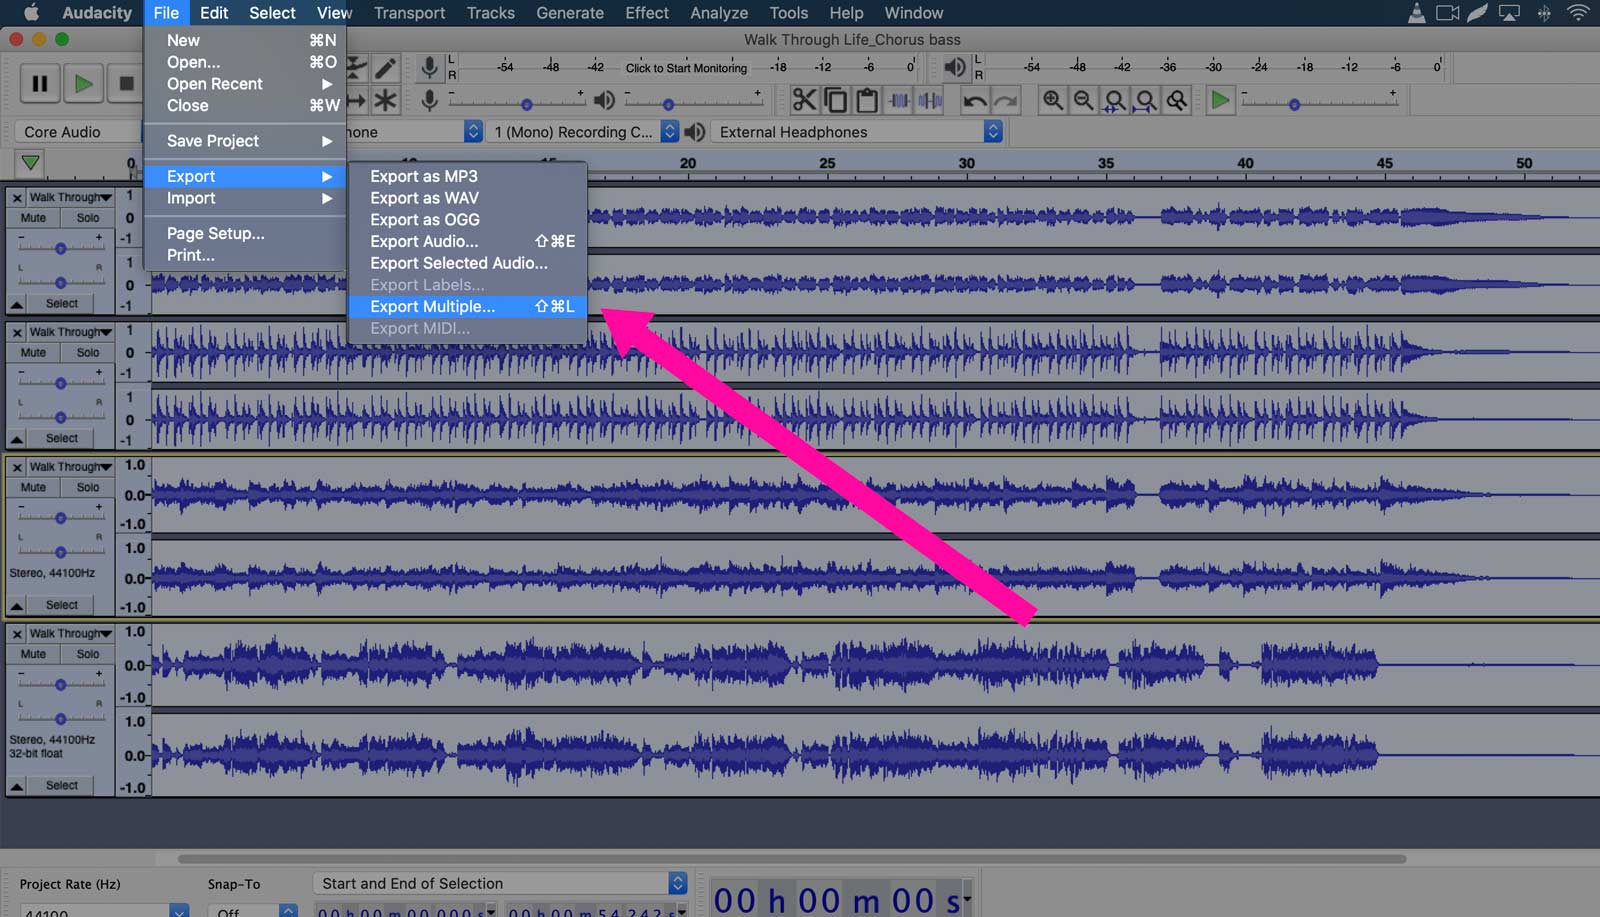
Then go to File > Export and choose ‘Export Multiple’ to export each track as a separate audio file. On the export window, select the output location, file naming convention, make sure the audio file format is 16-bit PCM, and then click on ‘Export’.
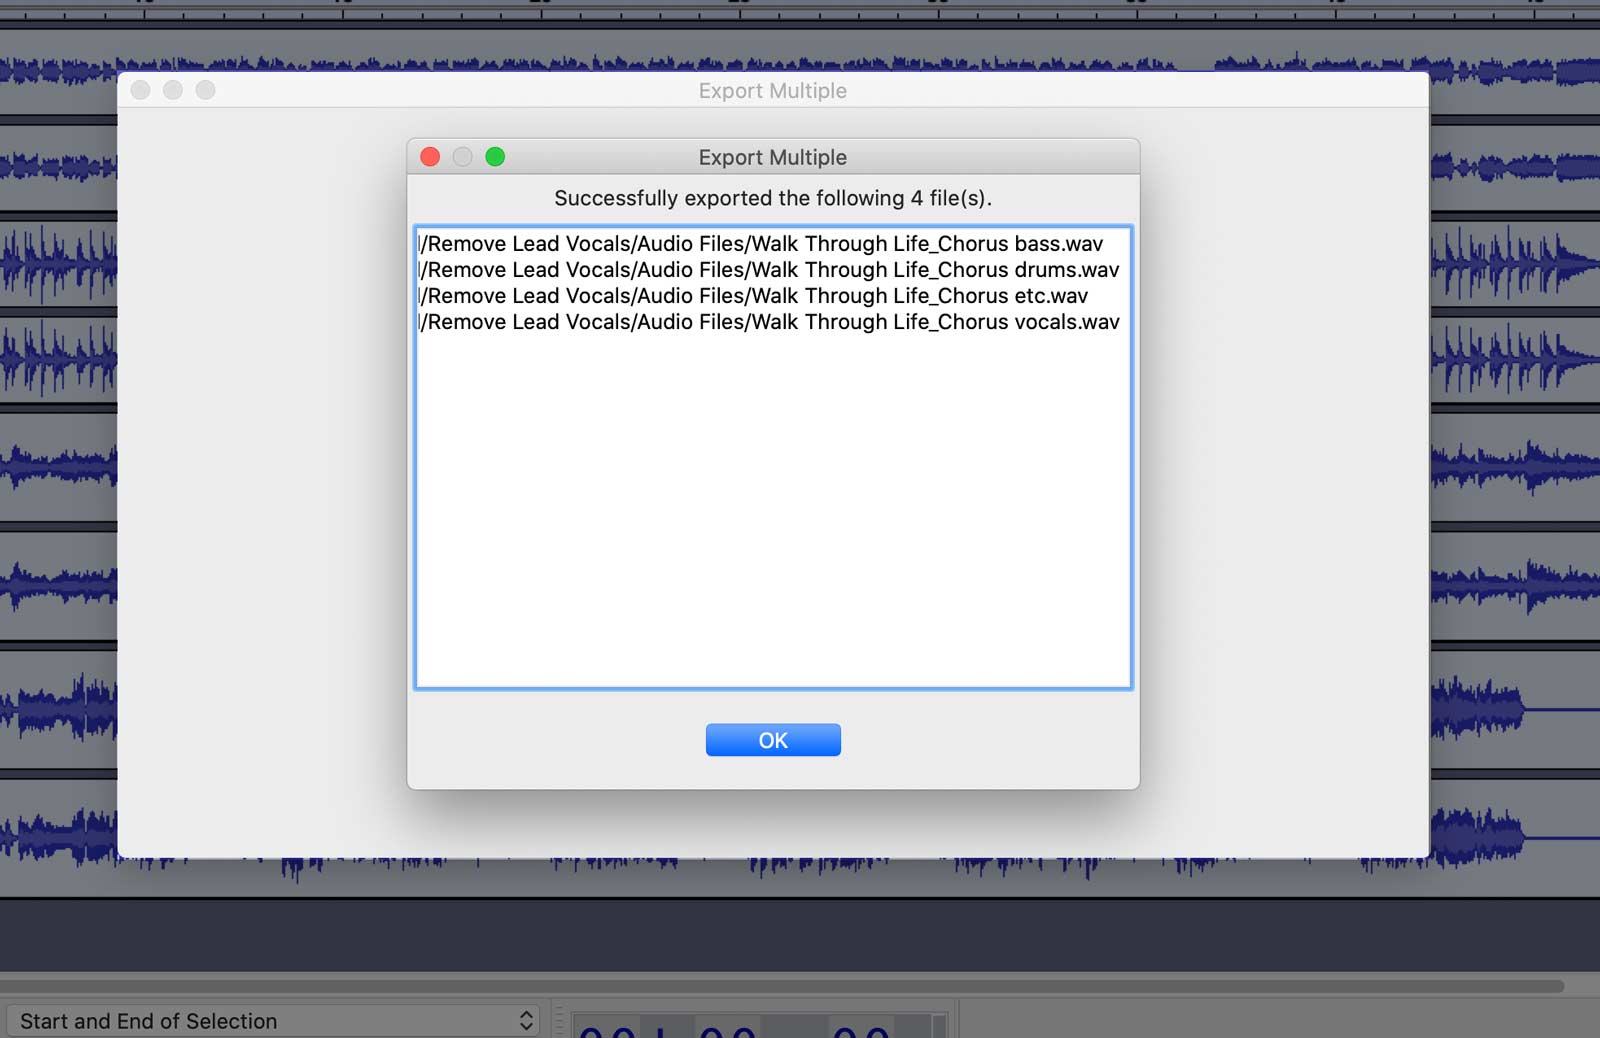
Your .flac files will be exported as .WAV files, which you can now import into your DAW (most DAWs accept WAV files as a standard).
Go ahead and import the WAV files into your DAW. Make sure to name your audio tracks appropriately.
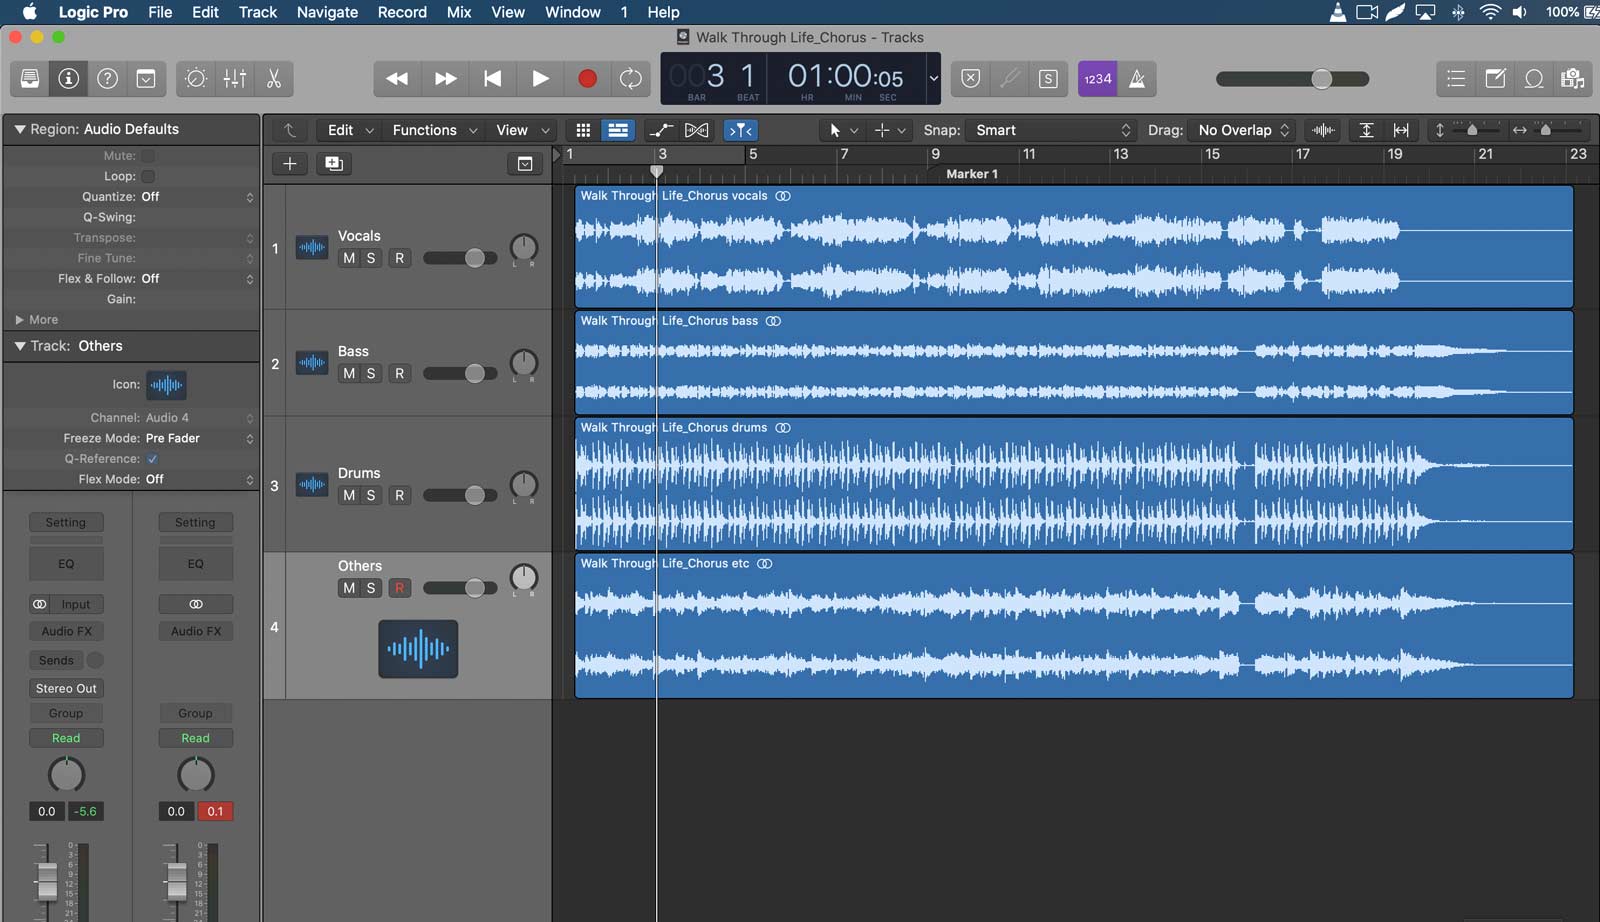
You should hear the full song If you hit play the button on your DAW.
If you’ve followed this far, you’ll see that the reason we broke down the song into separate audio stems is so that we can apply M/S processing to just the vocal track, rather than to the entire song.
First, load up a compressor that supports M/S processing on the vocal track.
The M/S compressor will create two separate processes, one for the mid and the other for the sides. In Logic Pro, I loaded up the stock compressor, choosing ‘Dual Mono’ mode.

This brings up the compressor plugin. We’re going to use the compressor to attenuate the lead vocals in the mid, so make sure to set the M/S compressor to process only the mid.
On Logic Pro’s compressor – I clicked on the gear icon on top, opening a new window. I then selected mid/side and set the compressor to process audio signals in the mid.
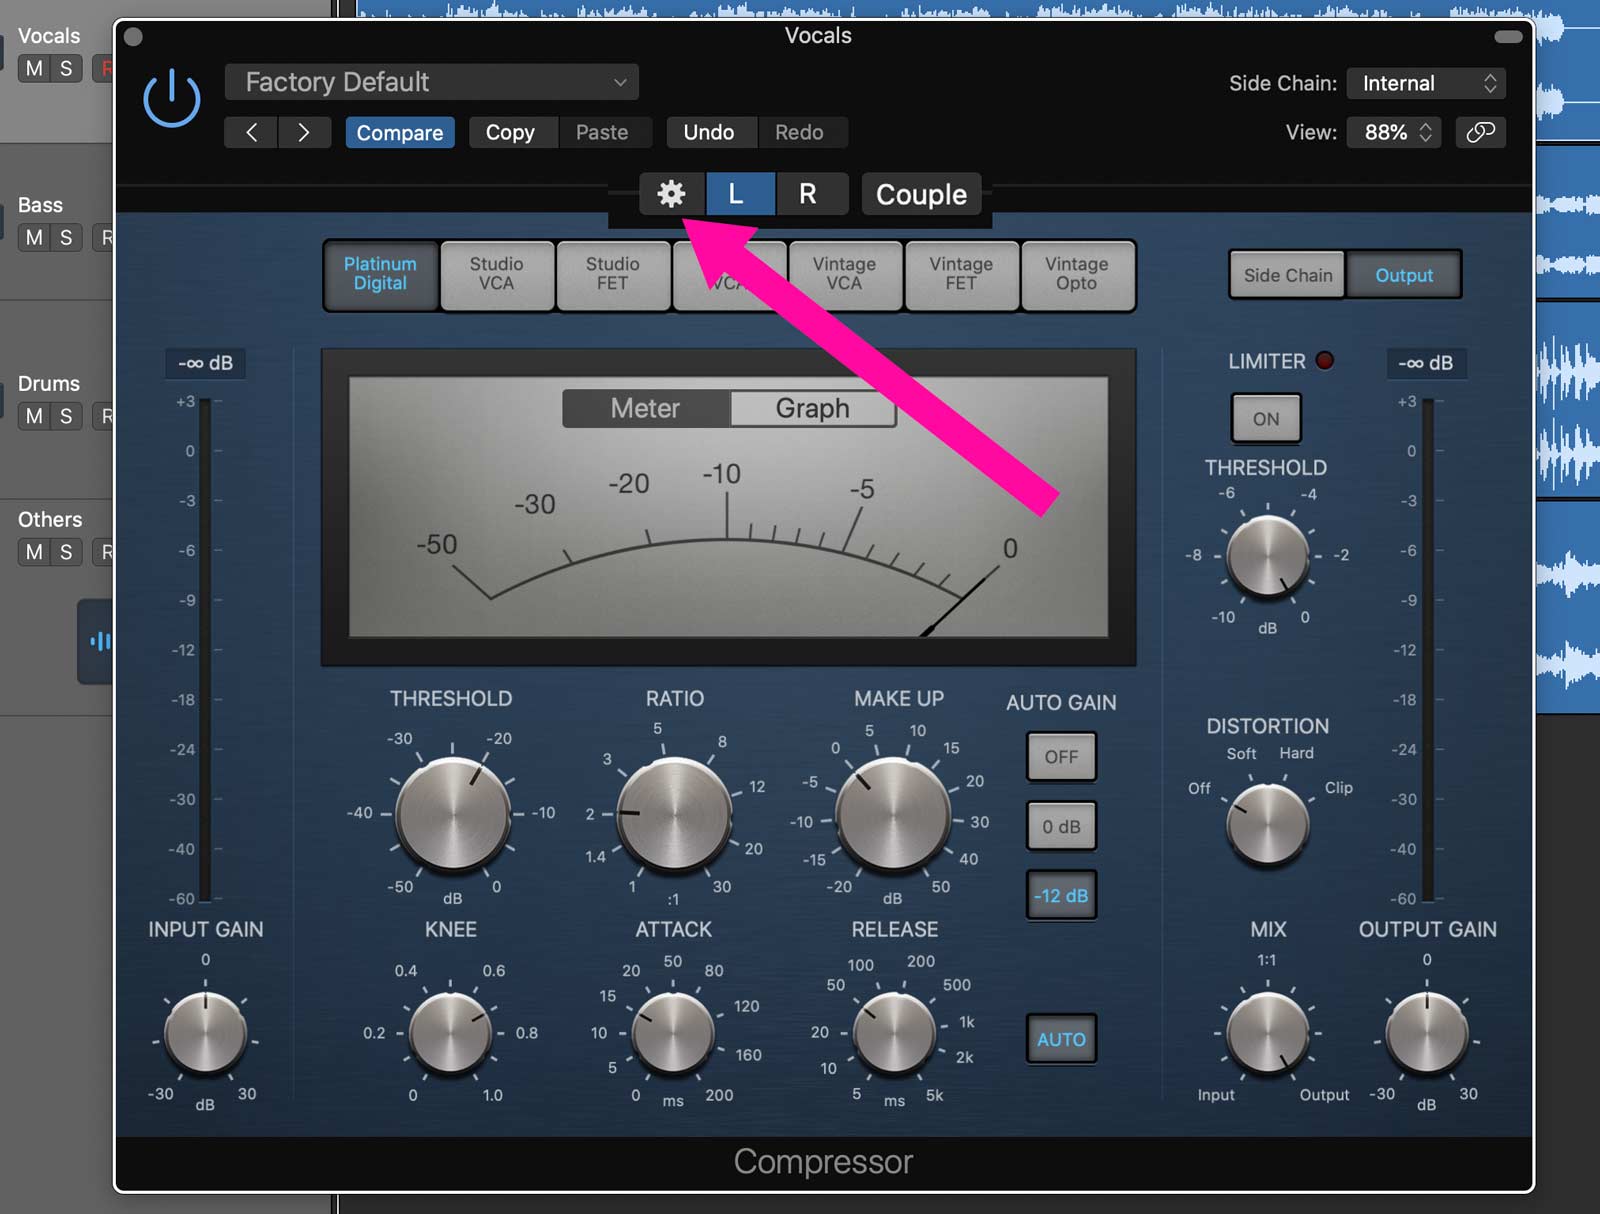
Click on the gear icon to reveal the stereo – Mid/Side settings.
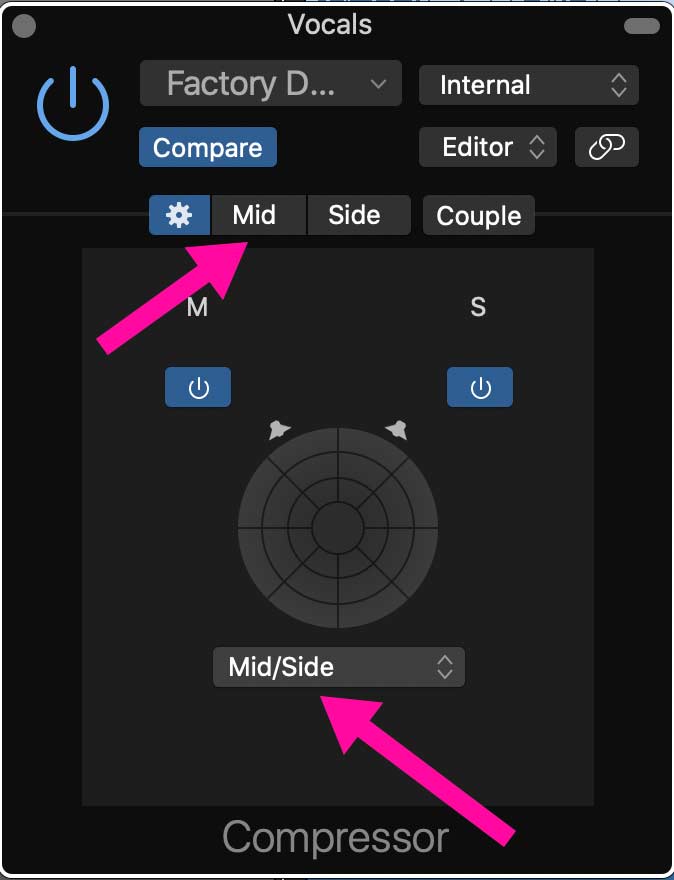
Set the compressor to process the Mid/Side and choose Mid.
Once set, the compressor will process only the mid audio signals.
Before you dial in changes on the compressor, make sure to solo the vocal track, so you could hear the changes as you adjust.
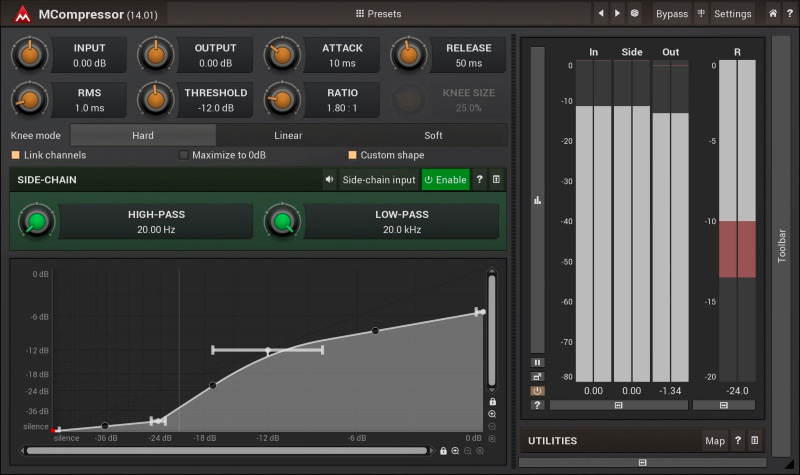
I set a low threshold of -35dB and a fairly high ratio of 5:1 on the compressor. I also set a fast attack of 20ms, so the compressor kicks in quickly and a long release of 800ms so that the compressor stays on the signal. Then, I made sure to turn off the auto-gain and lower the output gain.
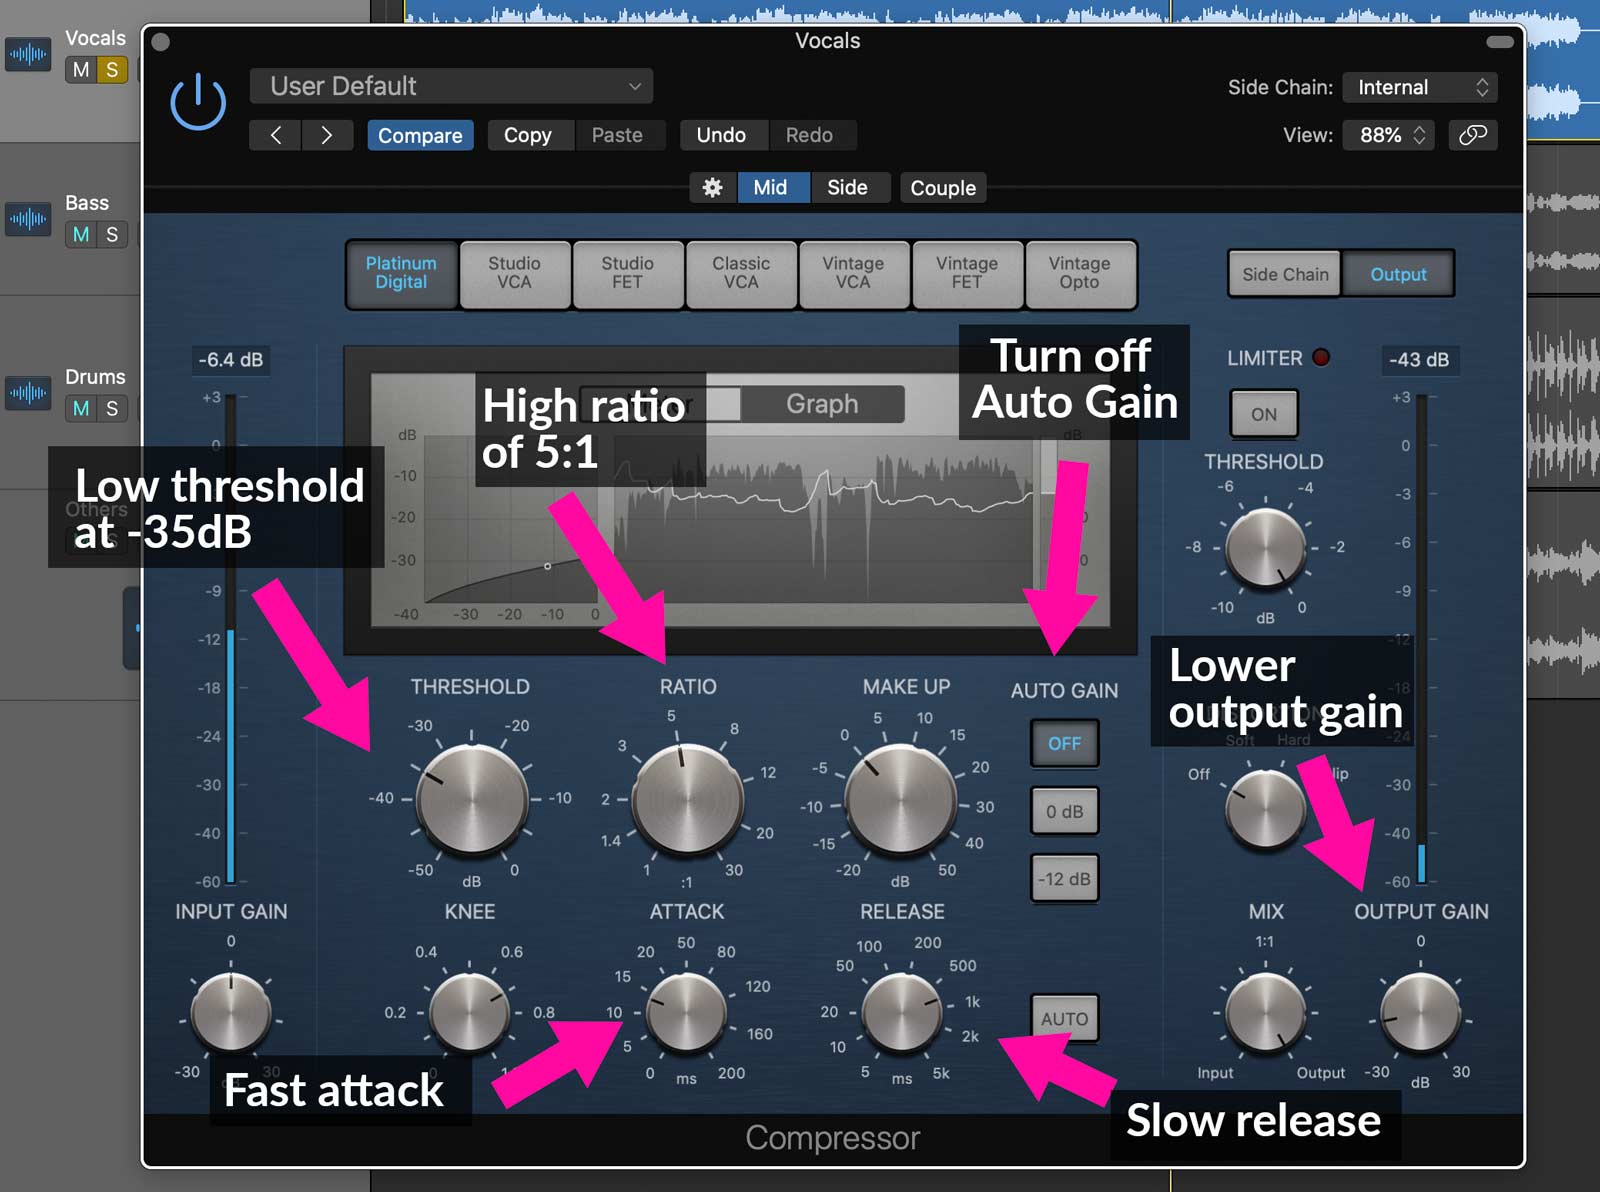
Keep in mind that there’s no one definite setting when using compressor effects. How much compression and which settings to dial, really depends on the vocal track you’re working on – so remember to always use your ears.
If you have compressed the mids signals correctly, you’ll find that the lead vocals would have been reduced by a bit.
Let’s use an M/S equalizer after the compressor to further shape the vocal track.
I loaded Logic’s channel equalizer (EQ) and chose ‘Mid Only’ under the processing option. Again, this enables the EQ to process only the mids of the audio signal.
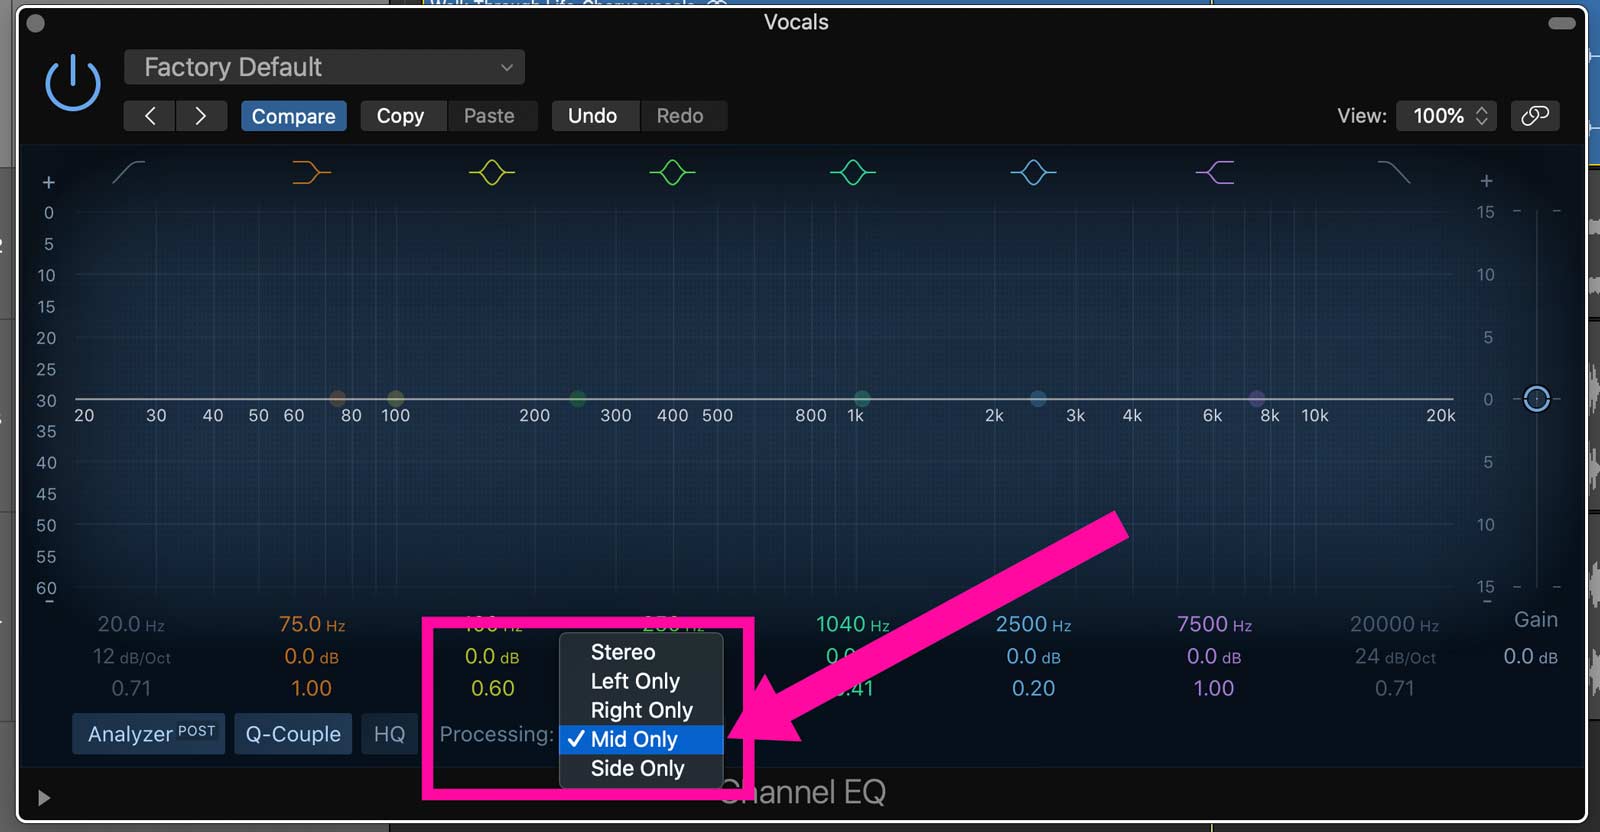
Use the EQ to cut frequencies where the lead vocals are most prominent. Male vocals usually have a frequency range from 100Hz - 300Hz, while female vocals are usually from 200Hz - 400Hz.
In my case, I used two drastic bell curve cuts at around 300Hz and 1000Hz, since the lead vocals in the song were more prominent around those frequencies.
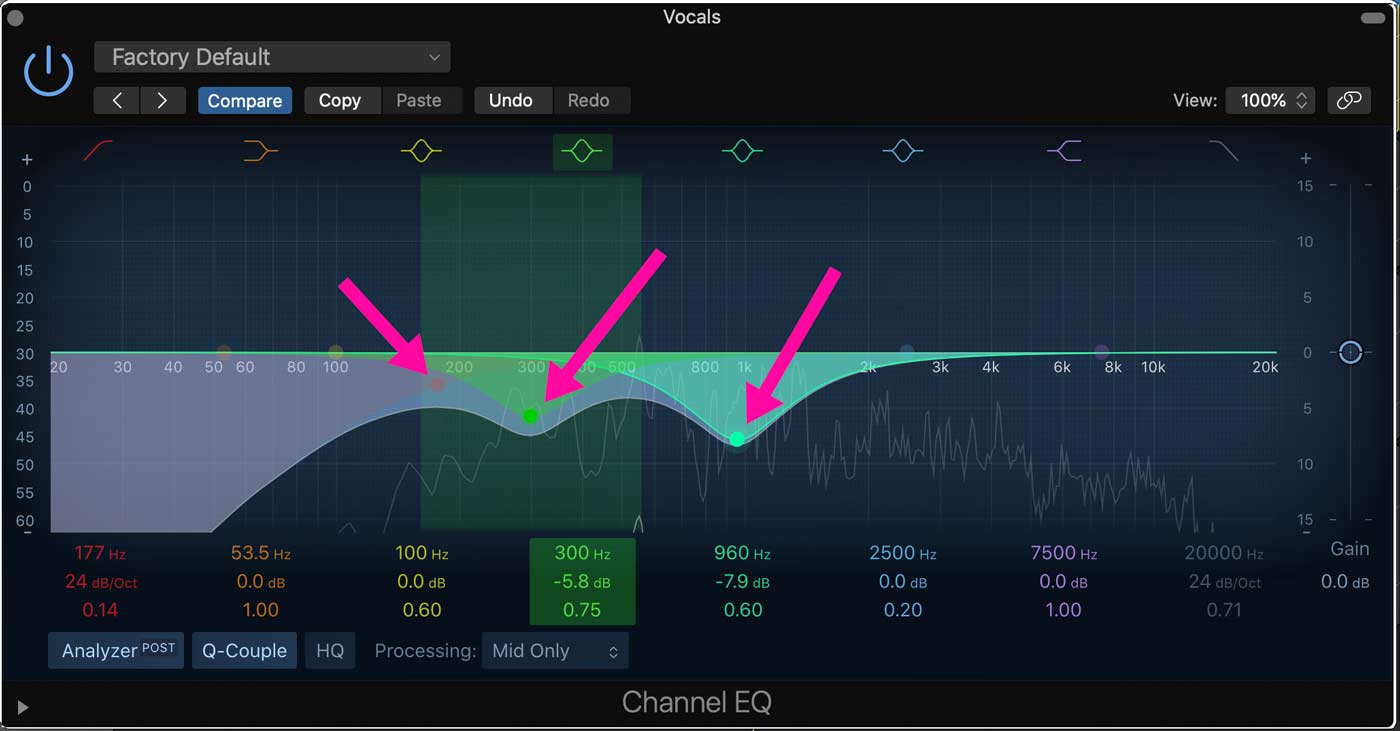
I also added a low-cut filter with a steep Q-factor from 177Hz to make sure any low rumbles or noise are removed.
At this point, we would have attenuated the lead vocals from the vocal track and left most of the background vocals in.
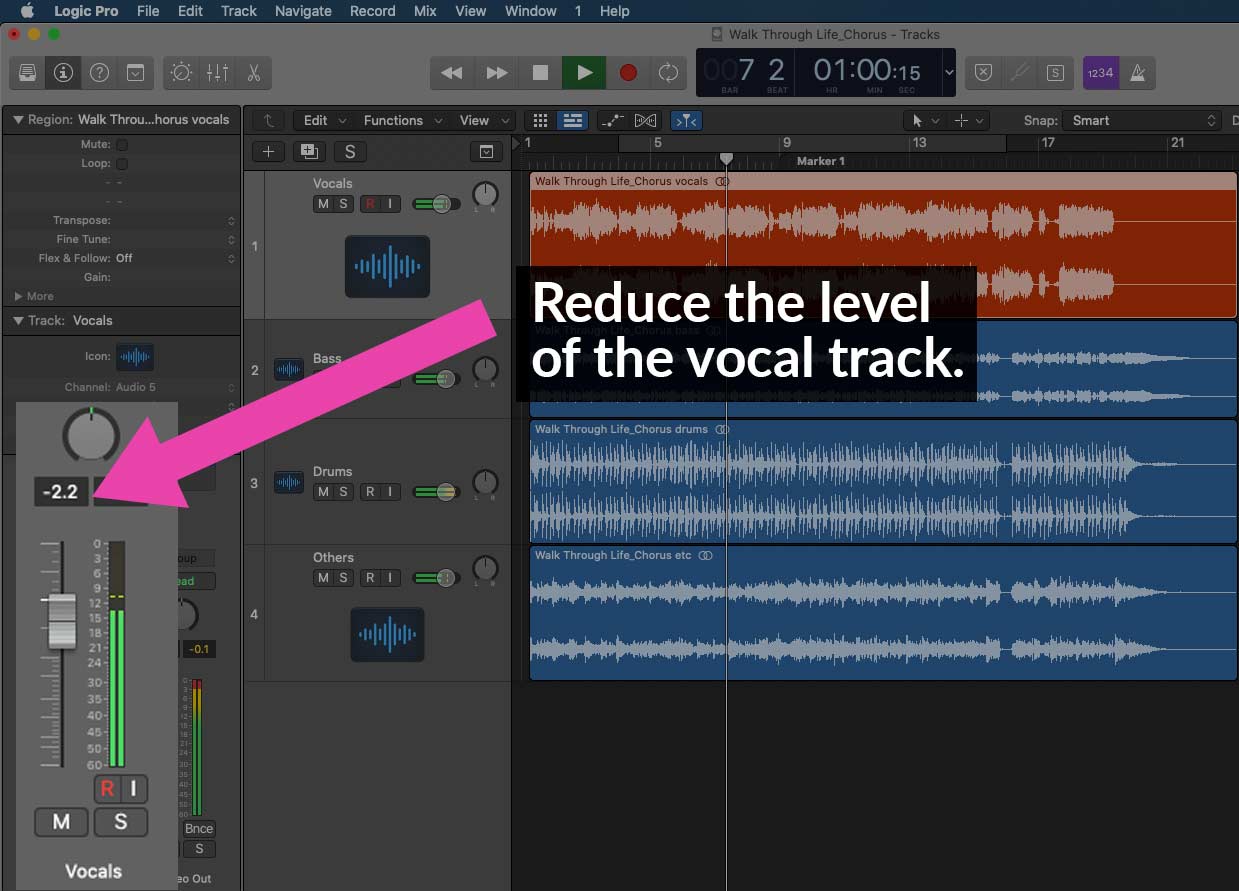
The last thing to do is to mix the audio stems together, with some audio leveling work. Ideally, we would slightly lower the gain on the vocal track for it to fit into the mix.
Once you’re satisfied with your mix, just export the entire project as an audio file.
Take a listen to hear how my song sounds like before and after M/S processing, including with some mix leveling.
Well done if you’ve reached this far!
So far, you have learned how to use M/S processing and used it to attenuate the vocal track in your song.
However, with the first method, you will find that the lead vocals are still audible at some parts of the song. That’s because what we did was just merely reduce the volume of the lead vocals.
What if you want a karaoke-ready song, with its lead vocals perfectly removed and its background vocals still in?
This is where a little bit more audio editing work can help. Coupled with PhonicMind, our AI stems-maker and vocal remover app, this is quite an easy process.
Let me break it down for you.
The first step is the same. Upload your song to PhonicMind and use the stems-maker to break it down into separate audio stems.
Again, download a high-quality format and convert the files into .WAV format if necessary.
Then import all four stems into your DAW. For my example, I uploaded them into Logic Pro, as separate audio tracks – Vocals, Bass, Drums, and Others.
Playback the song on your DAW and carefully listen to where the lead and background vocals are present. You can also solo the vocal track to listen more accurately.
As you listen to the vocal track, create markers for parts when only the lead or background vocals are present.
Eventually, we’re going to do three things:
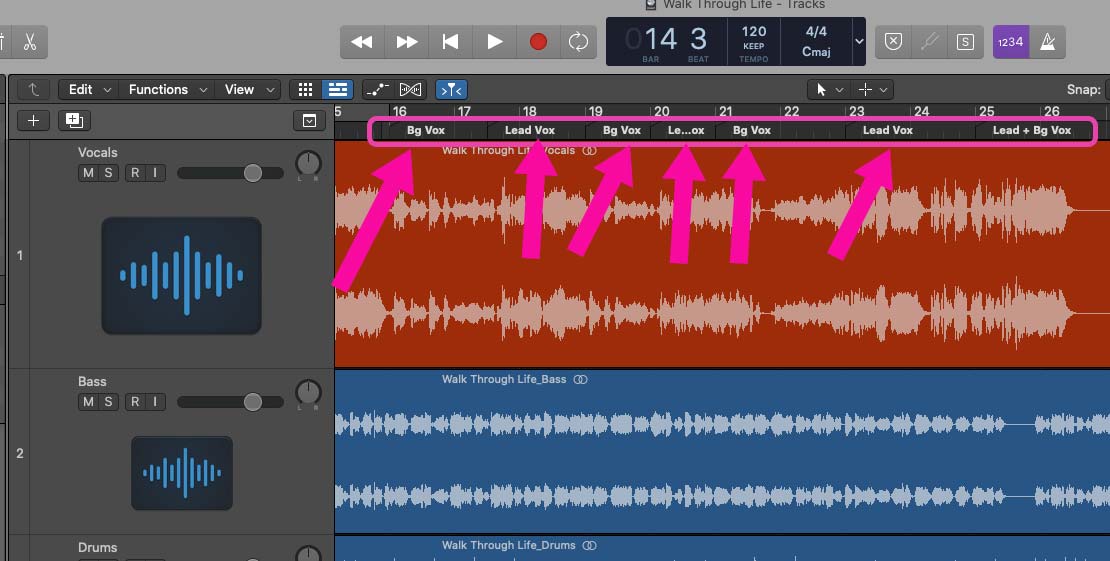
Creating markers will make it easier for you to identify the parts to mute, keep and attenuate.
Depending on the song you’re working on, you might even find opportunities to copy a background vocal riff from one part to another.
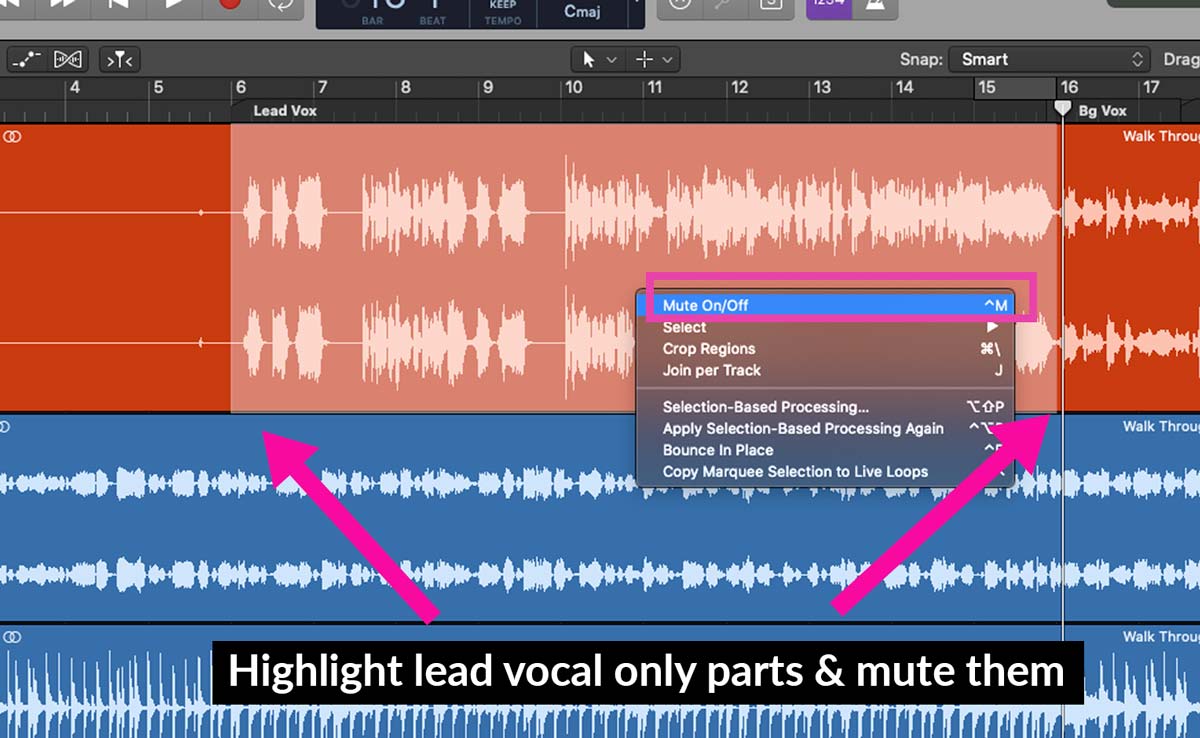
Once you’ve located all the parts with lead vocals only, we’re going to mute them.
In Logic Pro, I used the Marquee tool to highlight these parts and then simply clicked on mute.
Create a new track to place the parts where there are only background vocals.
Because we’re slicing the vocal track, make sure to create fades (fade-in & fade-out) to smoothen the transition of any sliced regions. (See image below)
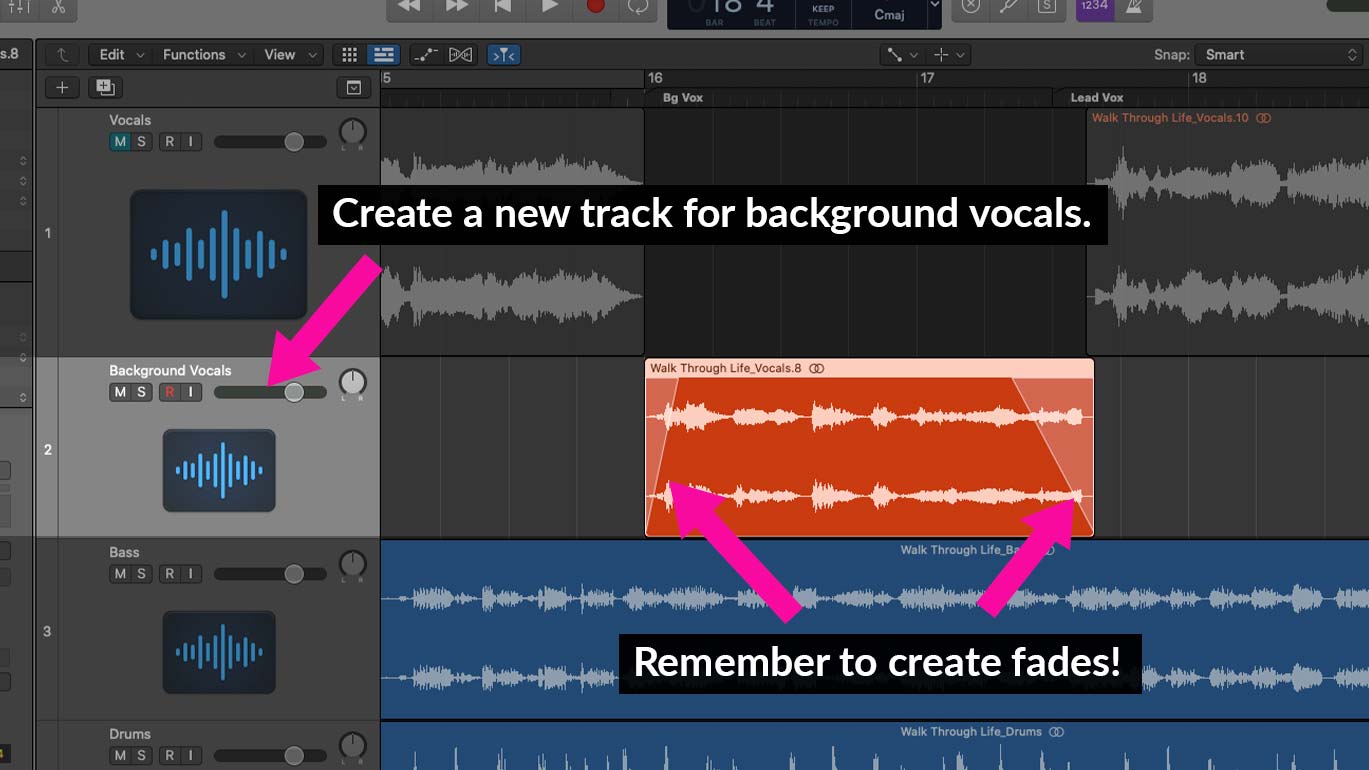
In Logic Pro, I used the fade tool to draw fades-in and out on the regions. Depending on your DAW, you might need to use volume automation to create the same fade effect.
Do this for the rest of the song.
For the song I was working on, there were some parts where the background vocal riffs were repeated. Since I have a cleaner background vocal riff taken from the first sung phrase, I simply copied the vocal riff and pasted it in the second phrase.
Watch how I copied over the vocal riff in Logic Pro:
At this point, you would have already removed most of the lead vocals and kept the background vocals.
But what about those parts where the lead and background vocals are mixed together?
This is where we can fall back to using M/S processing for those parts.
Cut the mixed vocal parts into a new track and insert an M/S compressor and equalizer, using the to attenuate the lead vocals, following the steps we’ve gone through in method 1.
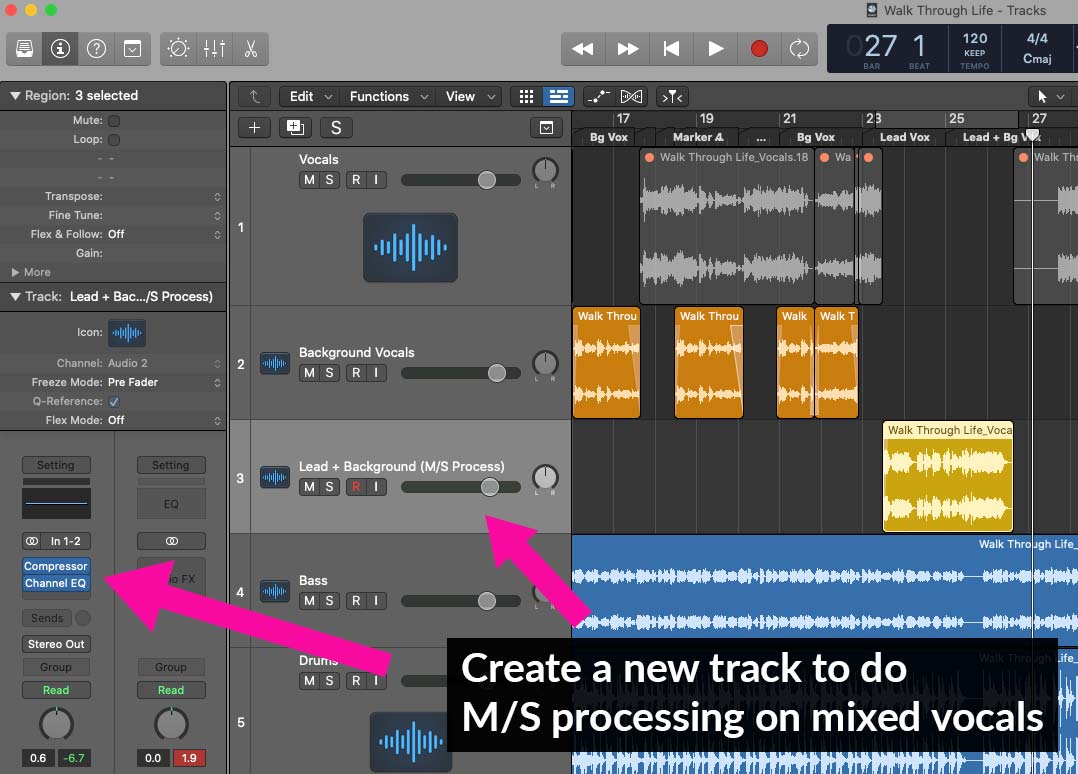
This way, we only use M/S processing for parts where we are unable to find a clean background vocal to replace with.
We’re almost done. Since we sliced the vocal tracks and shifted them around, we’ll need to do some light mixing – leveling and equalizing the vocal tracks.
I added fades to each of the sliced-up vocal regions, ensuring the audio transition is smooth.
You can add a high-shelf EQ to the background vocals, boosting the high frequencies around 4kHz to give it some excitement. Additionally, add a low-cut EQ from 150Hz to remove any unnecessary rumbles and to clean up the background vocals.
 My equalizer setting on background vocals.
That’s it! You should now have a karaoke-ready track, complete with its lead and background vocals separated.
Take a listen to my final song:
The process to remove lead vocals from a song and at the same time retain its background vocals can be a lengthy process. However, the end result is worth it.
Try this with your favorite songs, experiment with the steps along the way, and see what you discover. Good luck!

Audio Mentor
-----
"Music producer and marketer. I create positive change!"