
Want to turn your favorite songs into karaoke versions, complete with a music video to sing-along to?
Maybe you want an instrumental version of a song for singing practice. Or maybe you’re looking to sing in an upcoming wedding event.
Finding instrumentals or karaoke tracks online can be easy if you’re searching for a popular song. But with less-popular songs, it can be quite difficult.
In this guide, I’ll show you how to make your own karaoke music video – from searching for songs, removing vocals from the track, adding lyrics, effects, and exporting.
Let’s dive in!
Here are the steps we cover in this guide:
If you have a music track lying somewhere on your computer, you can skip this step.
Otherwise, here are some great places (legally) to search and download music.
SoundCloud – An open platform for listeners and creators with a database of over 125 million music tracks that you can’t find anywhere else. Some creators allow you to download their music tracks, which you can then use to make karaoke tracks.
Reverbnation – A social media platform for independent musicians to share their music. Again, some artists allow you to download their songs and create your own remixes.
Soundclick – With over 5 million songs, SoundClick is a platform that houses lots of independent music. While some tracks are badly-produced, you can still sometimes find some golden nuggets.
Bandcamp – A platform to discover artists selling their music and merchandise. You’ll find many artists selling digital downloads of their music.
Note: Keep in mind that although you can easily find, download and rip music online, you have to be mindful about copyright infringement, if you plan to use copyrighted music for karaoke music in public. Make sure to get proper authorization from the music owners before publishing a derivative work or performing with it.
It should be alright if you’re just doing this at home, privately. Making karaoke tracks with music is the same as taking a known music track and remixing it. It is what you do after that; reselling, publishing, or performing with the copyrighted music – which gets you into trouble.
The bottom line is, if you’re in the mood to sing your own rendition of “Bohemian Rhapsody” by Queen, I’d say go ahead, as long as you’re doing it at home for private use or a private home party.
Ideally, you want the original music track in an uncompressed high-quality format.
Here are some popular uncompressed (lossless) audio formats:
In terms of quality, it’s best to have your music tracks in WAV or AIFF. Both the format works on most popular Digital Audio Workstations (DAW) and audio editors, so you should be fine with any of them.
The only downside to uncompressed audio formats is that they are usually bigger in size. A CD-quality music track in WAV format will take around 10MB per minute.
This is where FLAC comes in as a size-efficient audio file. However, some audio/video editing software does not support FLAC, so you might have to convert the FLAC into the more widely-used WAV or AIFF formats.
And here are some usual compressed audio formats:
The way compressed audio works is by stripping parts of the audio file that we have a harder time hearing – generally the high-end and low-end frequencies, to produce a file size that is 10 times smaller than an uncompressed WAV file.
Generally, when it comes to creating karaoke tracks, it’s recommended to use uncompressed and lossless audio files to get the best-sounding results with a vocal remover like PhonicMind.
Tip: Need to convert audio file formats? Audacity is a free audio editing software that allows you to convert audio files to the formats you prefer.
However, remember that the quality of a music track will not improve if you were to convert a compressed audio file into an uncompressed format – such as converting an MP3 file into a WAV file. This is also known as upsampling.
Prefer the music track in a different pitch? Maybe the key of the original song is too high for you.
Luckily, you don’t have to look for karaoke pitch changer tools. Just use the in-built pitch changer effect in Audacity for free!
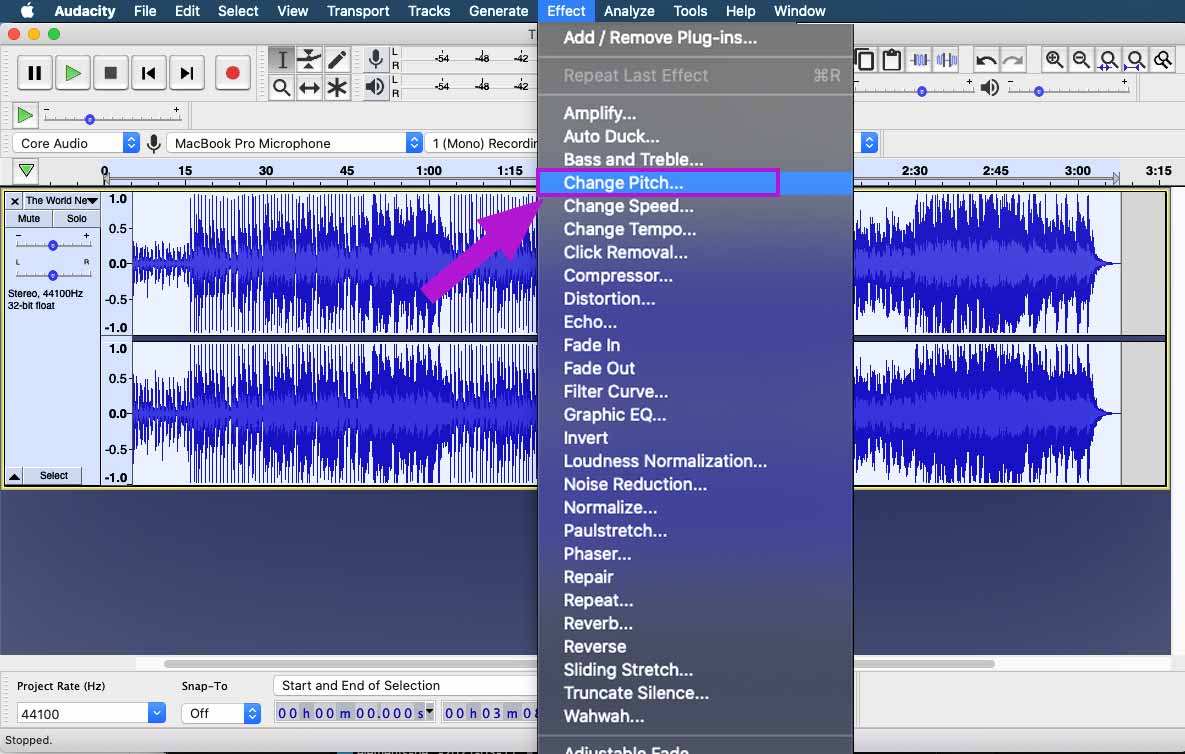
First, insert a music track into Audacity. Under ‘Effects’, you’ll find the ‘Change Pitch’ effect.
 When doing pitch scaling, try to keep your pitch shifts as small as possible. This is because drastic pitch-shifting will introduce unwanted audio artifacts to your music track.
Within the ‘Change Pitch’ effect in Audacity, choose to raise or reduce the key of the song by semitones. Make sure to keep the ‘Use high-quality stretching (slow)’ option checked to keep the quality of your music track high.
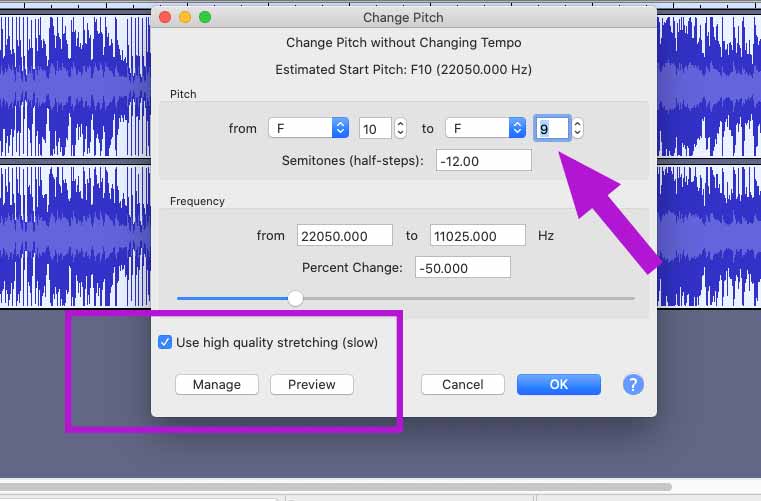
Click ‘OK’ and that’s it! Your music track will be pitched to the key that you chose.
Note: I recommend only changing the pitch of a music track when you really have to. On top of that, it’s usually better to change a music track’s pitch after you have converted it into a karaoke version because of the audio artifacts that you’ll inevitably introduce into the music track.
There are few methods to remove vocals from music, such as using phase cancellation or hard equalizing.
However, the best way to make a clean and good-sounding karaoke track is to use the power of artificial intelligence (AI). This is where PhonicMind comes in. This section talks a lot about that specifically. Whether or not you plan to use PhonicMind, a lot of the steps should still be helpful for you.
Let’s continue!
Head on to PhonicMind, click ‘Try It Now’ and drop your audio file into the window.
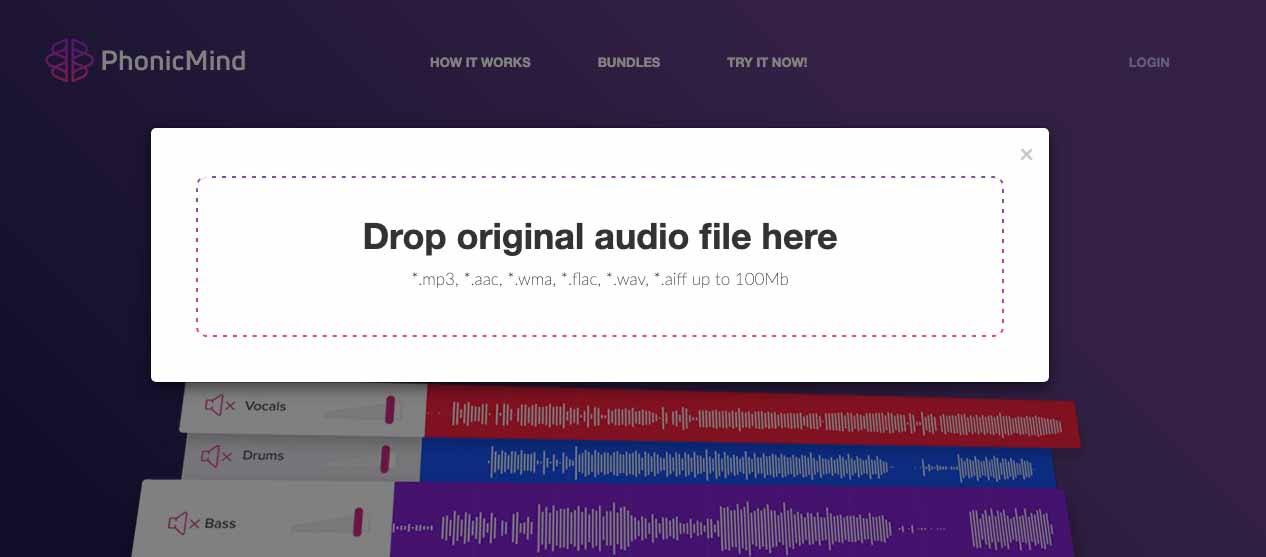
It’s best to use a high-quality, uncompressed audio file (FLAC, WAV, or AIFF) so that the AI-based vocal remover has more audio data to work with, resulting in a better-sounding karaoke track.
PhonicMind will take a few minutes to process, depending on the length of your track. Once processed, you’ll see your music track broken down into 4 stems – Vocals, Drums, Bass, and Other.
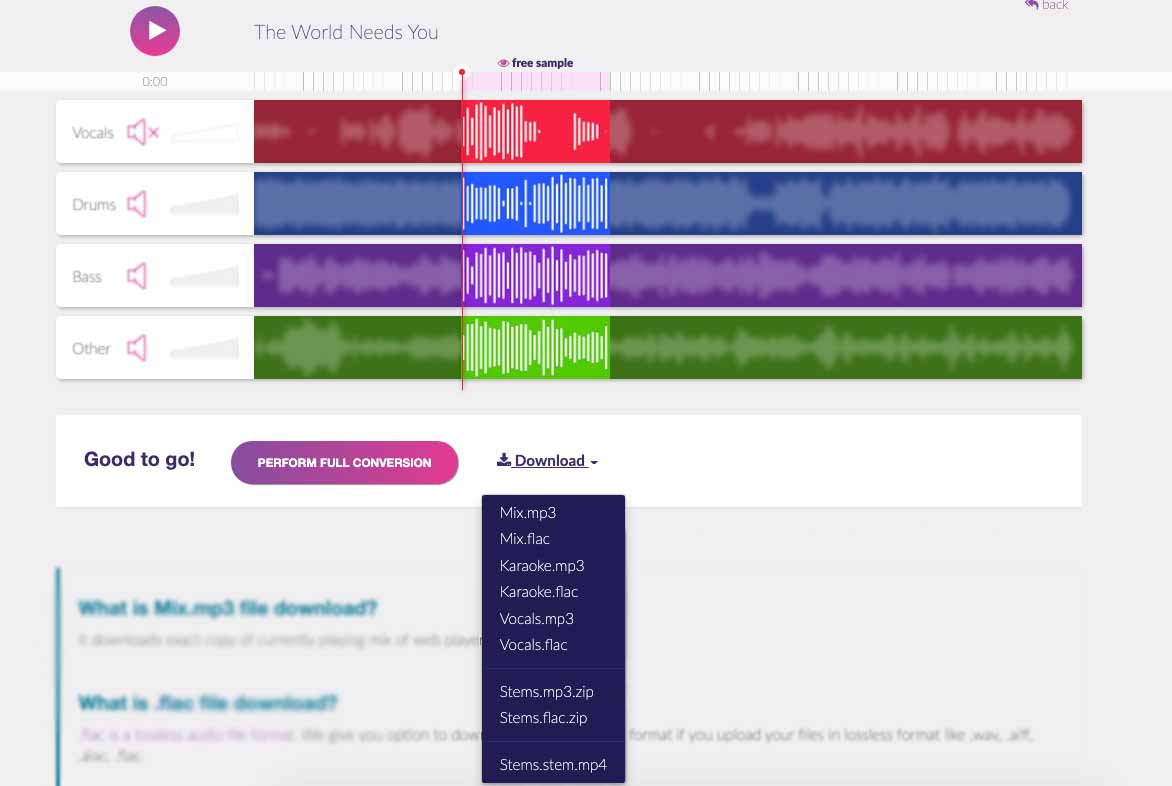
The stems are basically what makes up the music track. And by muting the vocal stem, there you have it – a karaoke track!
You can preview the stems using the mixer, muting and unmuting certain stems to hear how it sounds. Once you’re ready, hit ‘Perform Full Conversion’. PhonicMind will take a few more minutes to process and prepare everything.
Once done, click Karaoke.mp3 or Karaoke.flac to download your karaoke-ready music track, without vocals!
Next, we’re going to create a video to accompany your karaoke music track, turning it into a music video.
Here are a few free video editing software you can use:
In my example, I’ll be using iMovie to create a karaoke music video. Depending on the video editing software you use, the steps will be different. However, the fundamentals of creating the video are similar.
Launch iMovie and create a new project.
On some video editing software, you would have to define the video dimensions. Depending on where you plan to playback your karaoke music video, choose the appropriate video dimensions, frame-rates, and format.
Read more about video formats here.
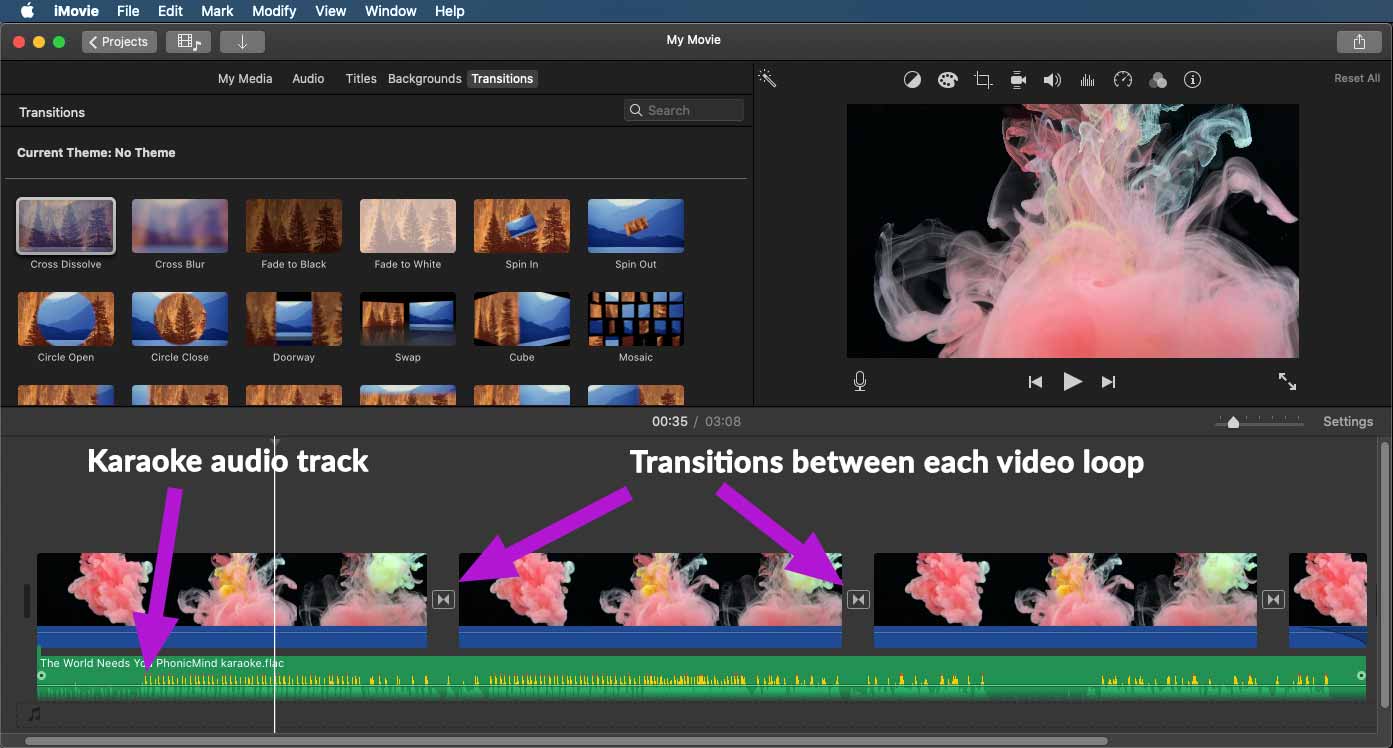
You can choose to create your karaoke music video with images or videos. I wanted something simple, so I downloaded a free stock video from Pexels, imported it into iMovie, and dropped it into the timeline.

Next, we’re going to import the karaoke music track we downloaded from PhonicMind and place it along with the video.
Because my music track is 3:08 minutes long, I had to loop the stock video a few times and made sure to put a nice transition between each loop, so that the video transitions.
With our video and music in place, now it’s time to add lyrics to make it a complete karaoke music video!
On iMovie or the video editing software you use, click to add text or titles. Replace the text placeholders with the song lyrics and make sure to time them correctly to each singing phrase.
Tip: You can find lyrics to most songs on AZlyrics.
Add some effects such as fades and zooms to the text lyrics. This adds some movement to your video and makes it more exciting to watch and sing along to.

Go ahead and finish adding the lyrics to the whole song, while carefully checking the synchronization of lyrics to the music. It’s a good idea to fade in the lyrics a little earlier before it’s supposed to be sung to make it easier for you to follow the lyrics when singing.
Tip: Put some personality into your karaoke music video by using different fonts for the lyrics! Download fonts for free from websites like DaFont or FontSquirrel and use them for your text lyrics.
Here’s how my karaoke video looks like with the lyrics added:
The final step is to export your karaoke music video, so you can play it back during your karaoke sessions.
On iMovie, I simply clicked on ‘Share’, chose the ‘File’ option, and then set it to high quality before exporting.
Depending on your video editing software, you might have additional exporting options available.
Choosing a suitable video format depends on what you plan to do with your karaoke video, whether you plan to record it into a DVD or simply export it as a digital video file. If in doubt, the best video format that works on most platforms is MP4 with H.264 video codec and AAC audio codec.
H.264 is a popular video compression standard for high-definition videos, designed for efficient file size and online playback.
So there you have it! You’ve successfully converted a song into a karaoke music track and then took another step to create a complete karaoke music video.
Just remember to be careful with copyright infringement, where you must get proper authorization before performing or publishing any copyrighted music publicly.
Other than that, have fun and we hope you sing your hearts out!

Audio Mentor
-----
"Music producer and marketer. I create positive change!"