
Have a song you want to sing along to, but the key is too high?
Perhaps you’re into music sampling and production. You found a great sample, but there’s a slight issue. The key of the sample does not fit with your track.
This is when pitch-shifting and transposition come in, to raise or lower the original pitch of a song or sample.
Before we go into the nitty-gritty of pitch shifting a song, it’s best to learn what a music pitch is in the first place.
A pitch refers to the position (how high or low) of a sound.
Sound (sound waves) are produced through vibrations and the frequencies of these vibrations are measured in hertz (Hz). To help give you some perspective, bird chirps have high frequencies usually ranging from 1000Hz to 8000Hz and therefore are perceived as a high pitch.
An engine rumble, on the other hand, has a low frequency, below 400Hz, and is considered a low pitch sound.
And transposing simply means shifting a song or sample’s pitch. Sounds easy, yes?
But before we jump into our audio editing software and start pitching things – it’s important to learn a bit of music theory and how pitch-shifting effects work.
When you transpose the pitch of a song, you’re essentially bumping it up by semitones.
What is a semitone, you ask?
First, picture a music keyboard. In Western music, notes are in a chromatic scale, running from the left, bass, to treble on the right.
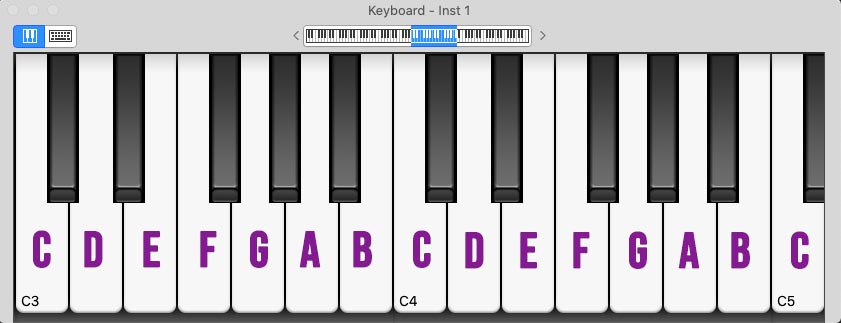
A semitone is the smallest interval between two notes. It’s also known as a ‘half step’. Let’s take a look at two semitone examples:
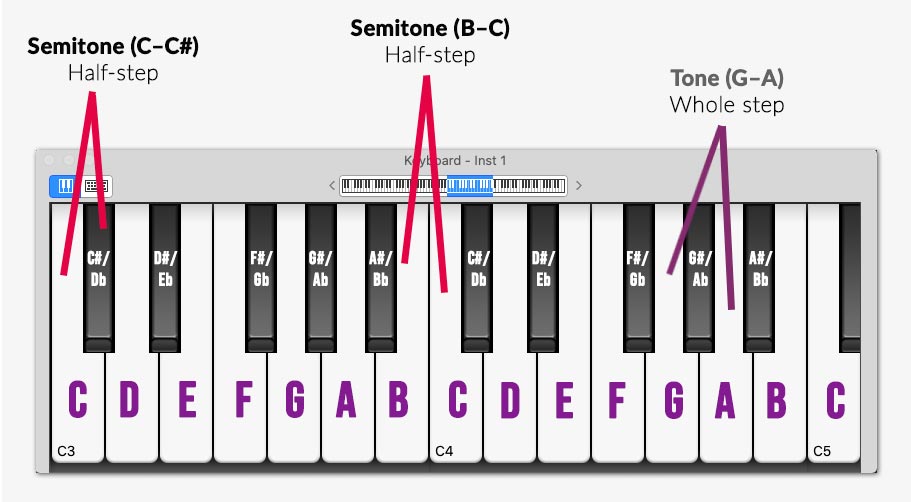
In the example, notes C – C# and B – C is a semitone. G – A, however, is a tone.
So why is knowing all this important?
That’s because if you want to transpose a song from the key of C to D, you then need to raise the pitch not by one, but by 2 semitones!
See how we’re putting our music theory knowledge to use?
Luckily for us, pitch shifting effects are quite common. Most audio editing and digital audio workstation (DAW) has it included out of the box.
 The pitch shift effect in Audacity.
Make sure to check the manuals of your DAW if you’re unable to find a pitch shift function.
Otherwise, I’d recommend you to use Audacity, an open-source audio editing software that you can download for free.
The steps to doing pitch shifting might be different on different audio software and systems. However, fundamentally, the process of transposing (pitch-shifting) a song or sample is the same.
That’s why it’s important to first understand how pitch-shifting and transposition works.
Although pitch-shifting effects and algorithms can be quite advanced these days, still a pitch-shifted song will not have its original quality.
However, we can attempt to lose as little quality as possible by using high-quality audio files or samples with a high sample rate of 96kHz or above, instead of the usual 44.1kHz or 48kHz.
Granted, this is not always possible. However, just keep in mind to use lossless audio file formats and get them at the highest sample rate possible.
Pitch shifting is a combination of time stretching and up/down-sampling. This means every time you do a pitch shift, the timing of the song or sample changes and goes out of sync.
Especially for vocal samples, pitch-shifting often distorts its formants causing the output results to sound like chipmunks (if pitched too high) or grouchy robots (if pitched too low).
Luckily pitch-shifting effects have evolved over the years. Without going into too much details, generally – there are two types of pitch-shifting algorithms:
Followed well so far? We’ve gone through the fundamentals of pitch shifting. Now, let’s put everything we’ve learned into practice.
In this walkthrough, I’ll be using Audacity to change a song’s original pitch. Even if you prefer using a different audio editing software, follow along, as you’ll learn some fundamental techniques along the way.
Let's get started.
Because my song had vocals in it, I processed it with PhonicMind, our stem maker, and downloaded a karaoke version of the song in .flac (lossless audio format).
Click here to learn how to remove vocals from songs.
Here’s the music track I used (notice the song’s pitch.):
Song: Si Fuera Yo by StudioMonkey
Launch Audacity and drop your audio file into the editing window.
As mentioned earlier, remember to use a lossless audio file format with a high sample rate of 96kHz, if possible.
You’ll see the audio waveforms load on Audacity, after dropping the audio file.
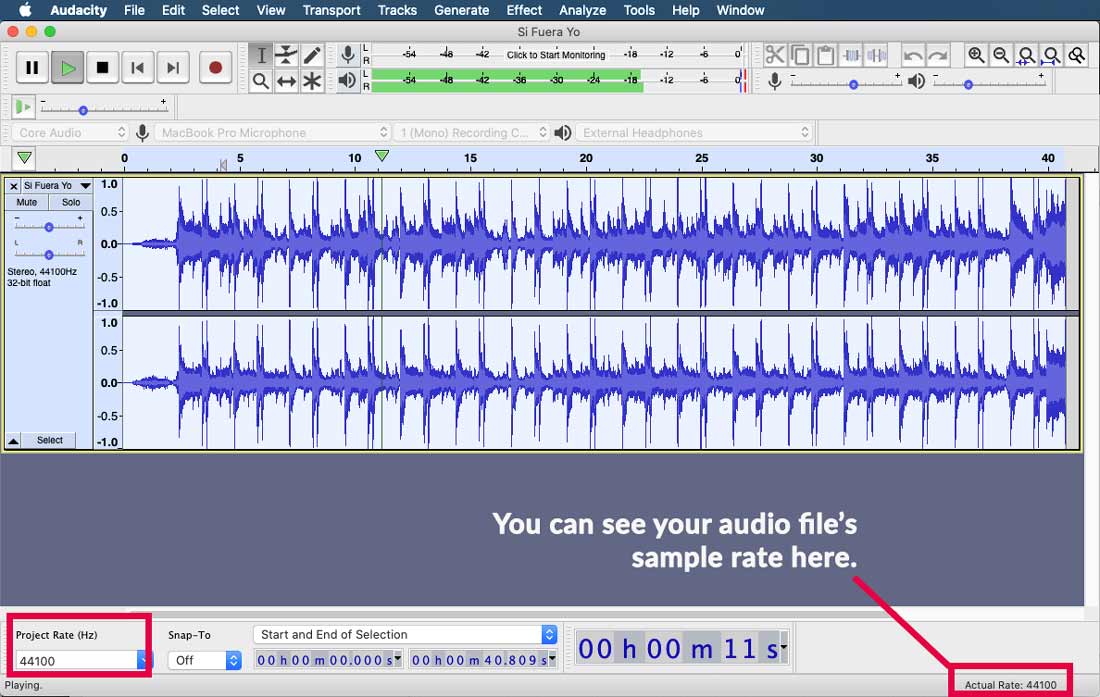
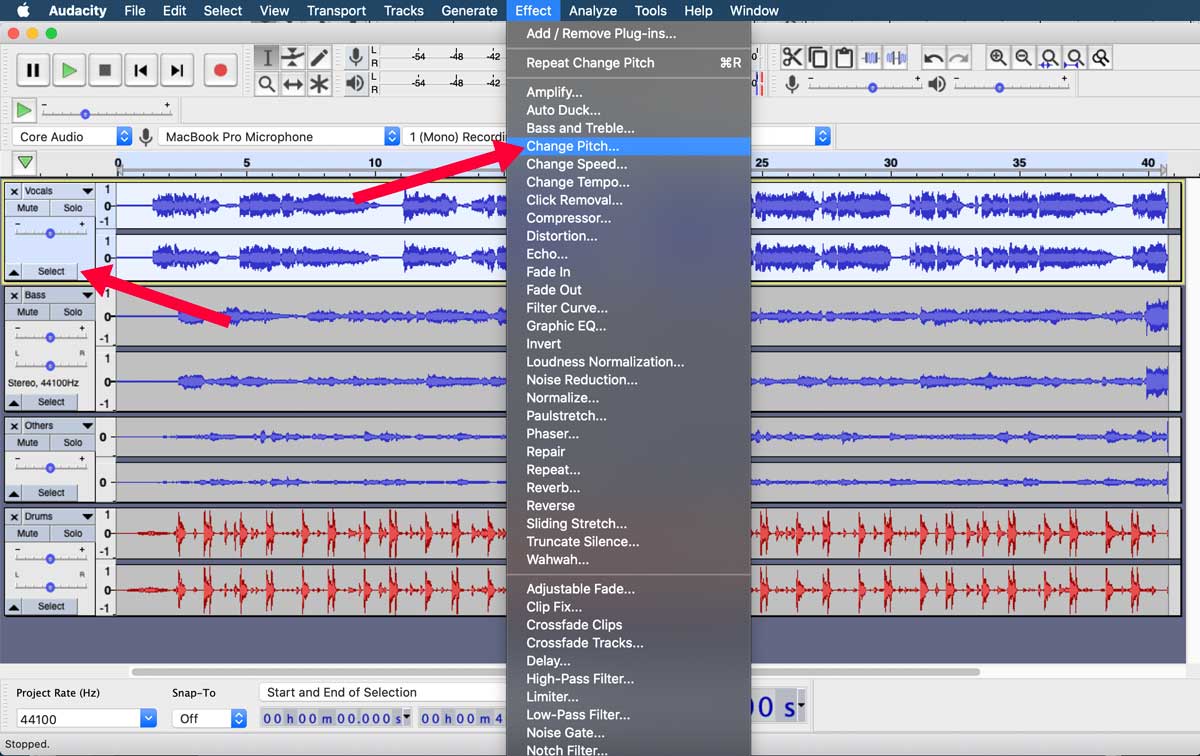
Because we want to change the pitch of the entire song, select the whole song by hitting Ctrl+A (Windows) or Command+A (Mac). Alternatively, you could also click on ‘Select’ on the track’s control panel.
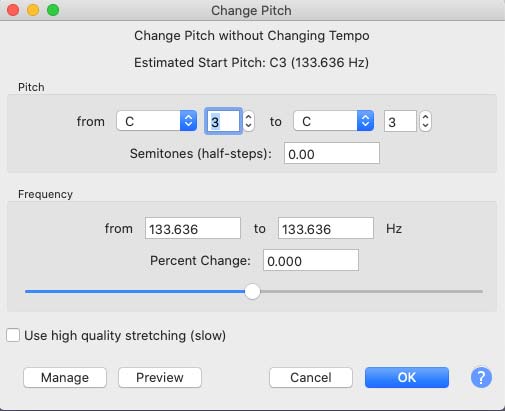
Once selected, click on the ‘Effects’ drop bar and select ‘Change Pitch’.
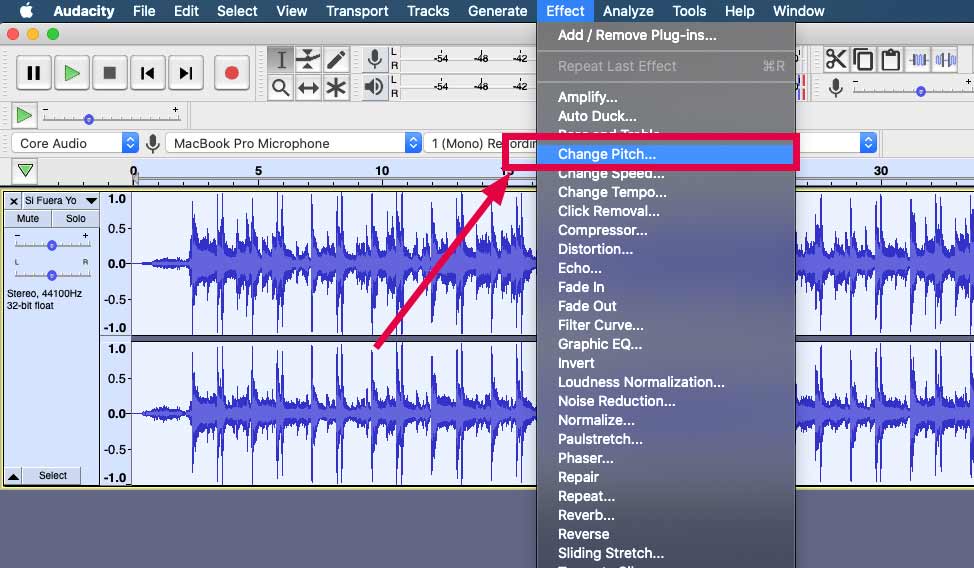
The effect window will launch and you’ll see some settings that now, hopefully, make sense to you.
You’ll notice that we have three options for changing the pitch of the song:
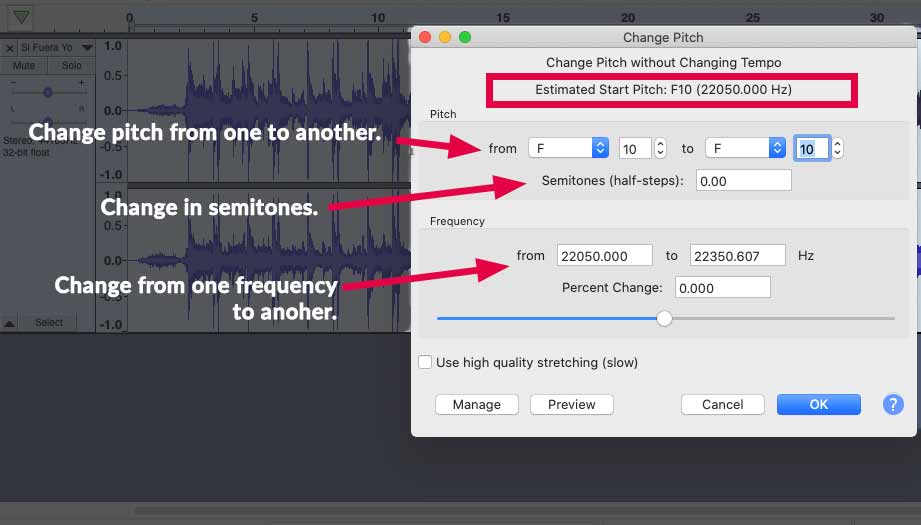
The pitch effect also estimates the pitch of the song. In my example, it detected that my song is in the key of F.
The easiest and most accurate way to change your song’s pitch is to change it by semitones.
Usually, there’s no need to raise or lower a song’s pitch by any more than 4 semitones. Remember, the wider your transposition, the more you degrade the quality.
In my example, the key of the song was too high for me to sing along to, so I decided to lower the pitch by 1 semitone (half-step).
On the effects window, I entered -1 in the semitones column.
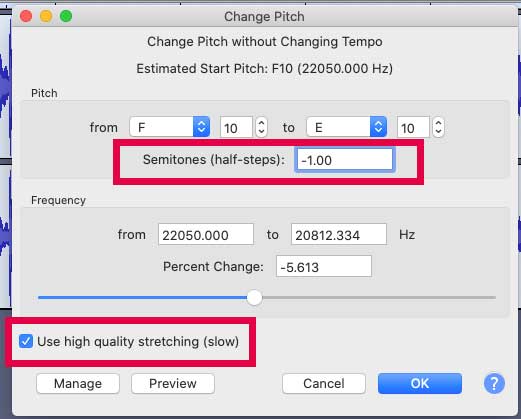
Make sure to check the ‘Use high-quality stretching (slow)’ option. Having it checked means the effect will take a longer processing time but output a higher quality result with fewer audio artifacts and distortion.
Once ready, just hit on ‘OK’. Audacity will usually take just a few seconds to process the entire song.
Here’s how the final output sounds (original and pitch-shifted):
And that’s it! You’ve successfully changed the pitch of your song or sample.
In our walkthrough earlier, we pitch-shifted the entire song by transposing the entire track.
While that is the general way of transposing a song, what happened is that every element, including drums, bass, guitars, and other elements are processed. And the thing with pitch shifting is that the more we process, the more audio artifacts we inevitably introduce into the song.
But what if we can transpose only the tonal elements of the song and leave any atonal elements like the drums, unprocessed?
This is where we can get creative using PhonicMind, our stems maker. Let’s put this to the test.
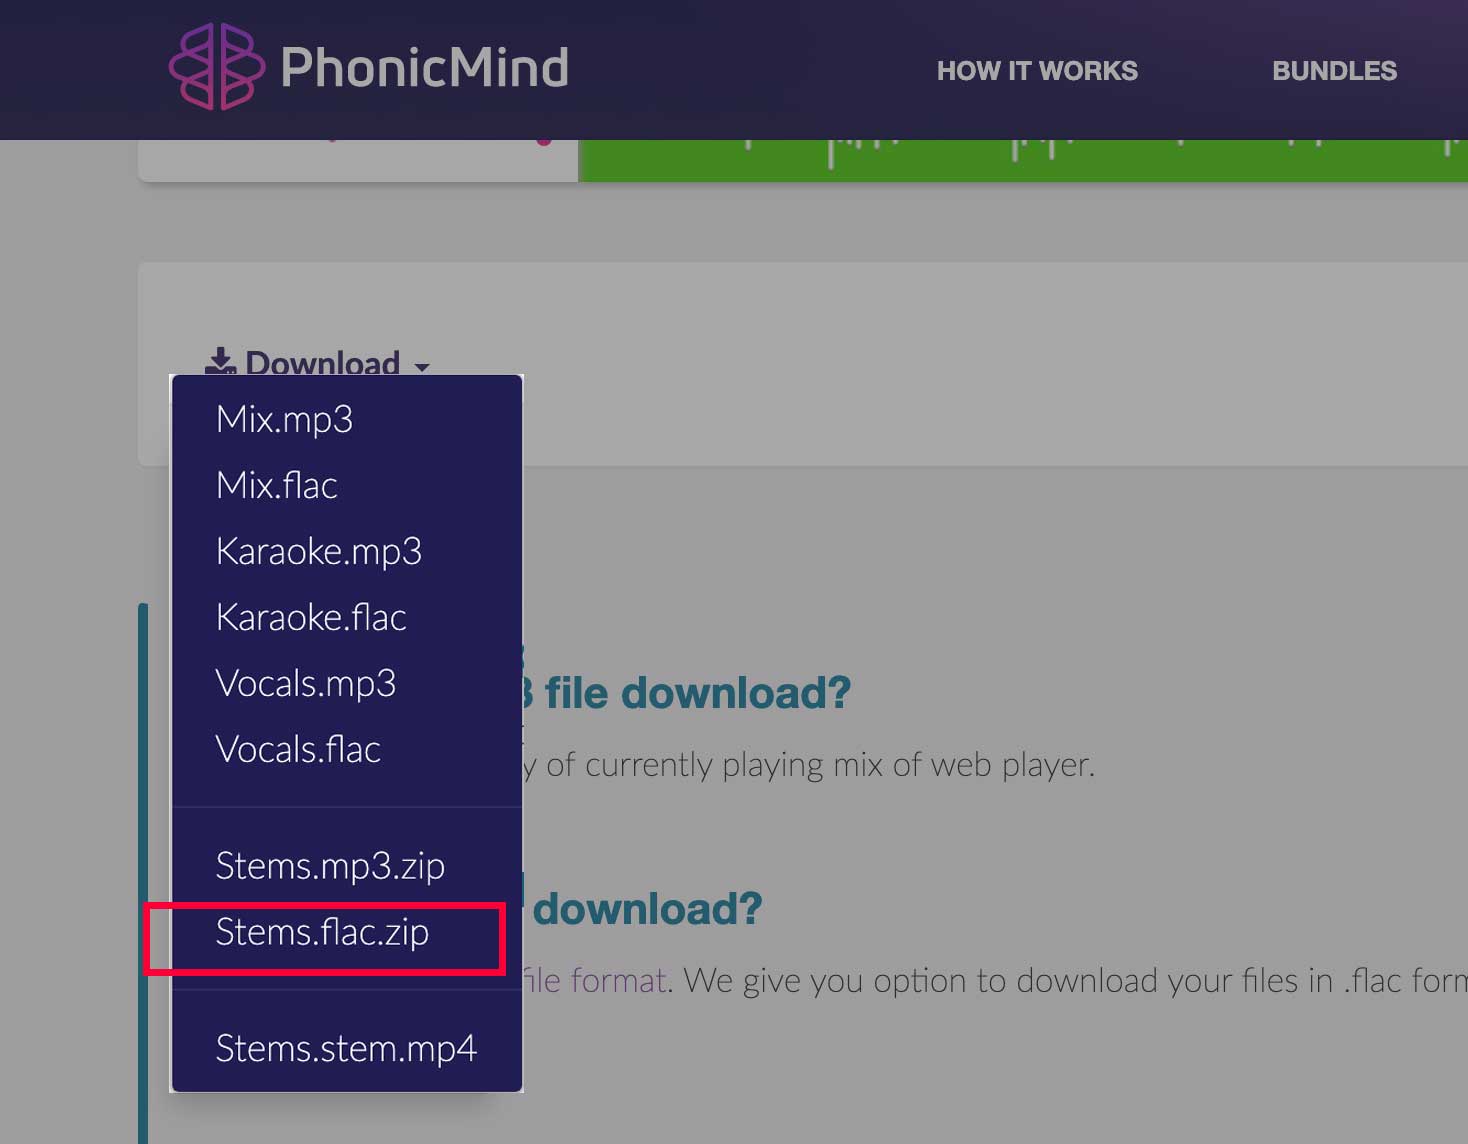
PhonicMind is a stems maker that we’ve built with an AI-based engine. Head to the homepage, click on ‘Convert’, and drop a song into the upload window.
Just the same as processing any audio files, always start with a high-quality lossless audio file whenever possible. PhonicMind will take a few minutes to process the song and once done, you can preview the audio stems before performing a full conversion.
For this example, I used the same song from the earlier walkthrough.
The difference this time is instead of choosing to download the karaoke version, I chose to download stems.flac.zip instead. This gives me four audio stems – vocals, drums, bass, and others.
Once the download is complete, use a file archiver like 7zip to unzip the file. You’ll find the four separate audio stems in .flac format.
Next, launch Audacity and drop all four of the audio stems into the editing window. This loads all four audio stems as multi-tracks in Audacity.
In my example below, I’ve colored the drum track red and left the others in default blue – to clearly see the tracks.
Just like what we did earlier, go ahead and change all tonal-based stems’ pitch, raising or lowering them to your wanted pitch – except the drum stem. The drum sound is an atonal element, so we want to retain its original sound.
Starting with the first track, click ‘Select’ to select the entire track. Then click the ‘Effect’ drop bar and select ‘Change Pitch’. Process the track following the steps we’ve gone through the earlier walkthrough.
Repeat the same process for each tonal-based audio stems – vocals, bass, and others.
Once you’re done with individually transposing each tonal-based audio stems, preview the entire mix by hitting the play button in the transport window.
Mix the tracks by reducing or increasing the gain (volume) of each track, while carefully listening for any clipping on the master output.
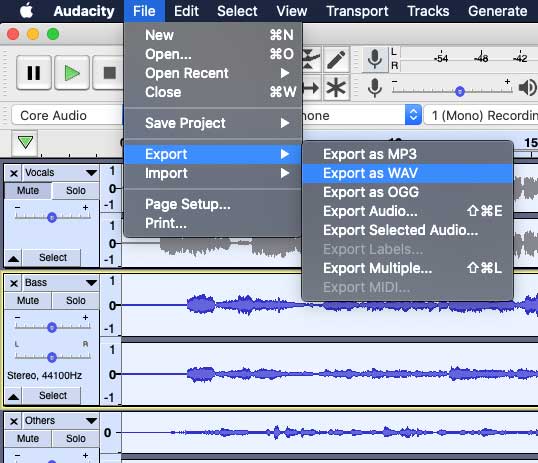
Once you’re happy with the mix, choose to export your tracks as a stereo file (File > Export > Export as WAV). I chose to export the mix in WAV (16bit) format to get a high-quality audio file.
And that’s it!
Watch the video below to hear the difference between directly pitch-shifting the entire song, versus pitch-shifting only the tonal parts of the song:
Notice how the drums are punchier and more pronounced in the version in which we pitch-shifted only the tonal parts.
By now, you should know how to change the pitch of any song or audio sample. Try changing the pitch of a few of your favorite songs and see what you discover.
Once you’re familiar with the process, move into advanced pitch-shifting by breaking down the song into a few audio stems and pitch-shift only tonal-based stems, before mixing them back together.
Happy experimenting!

Audio Mentor
-----
"Music producer and marketer. I create positive change!"